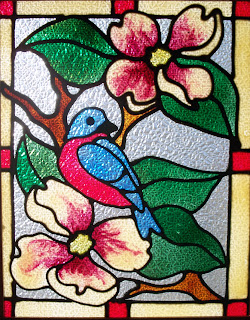
 One of our favorite readers has shared some more beautiful projects with us. You may notice some distinctive differences in the project on the left. I'm not positive, but I think that I recognize a special effect produced with the Gallery Glass pebble texture panel that was included in one of our Anniversary kits in 2000. However, you can get a similar effect by painting directly onto pebble textured clear ceiling panels. They come approximately 24" x48" and provide a nice large surface for painting that can be cut up into smaller projects. These two projects were originally 8"x 10" patterns. And regarding painting on ceiling panels, paint on the smooth side, that will give you even, uniform color, but the overall appearance (now with texture on the back side) will be uniformly bumpy. Plus, it is a lot easier to comb and tap when you paint on the smooth side. Painting on ceiling panels is a very inexpensive way to source a larger project surface. Because they manufacture millions of them, the retail price is very low, compared to buying custom cut clear plastic plastic panels that have the masking on both sides. And if you have a recessed lighting fixture in a room, such as a basement or kitchen, you can actually put the panel in the light fixture for an interesting decorative feature. However, you need to put the bumps up and the painting facing down into the room, so that the painted surface will not overheat.
 On a different note, here are two totally different roosters. One is textured like the Dogwood/Bird panel on the left above. The other has an interesting addition to the Gallery Glass painting that will give you lots of new ideas for embellishing. He used dried flowers at the top and bottom of the panel. I'm not sure if he added them before--or after the paint was dry. Tell us all, Bradford. If Roosters are one of your favorite collectible motifs, you're going to see that you are only limited by your Gallery Glass imagination. I must admit that I flipped the image of the one on the right so that it could be facing the other beautiful foul--something that you can do to the pattern before you begin, if you are creating a set of panels to match. Thanks, Bradford, for widening our horizons with your beautiful projects.


Hi Miss Carol, the textured paintings are indeed the plastic ceiling lighting panels that have the crinkled texture on the backside...I like the effect they give when the light shines thru them and the GG paint....it kind of shimmers.....I usually got mine from my local Lowes and sometimes they would cut them down into different sizes for me on their plexiglass cutting machine although I was told by some workers that the machine could not cut that material but since I've had them cut before I know it can be done by the machines.....as far as the dried flowers on the rooster they were glued onto the painting after the GG had dried and I used mod podge to glue the flowers with.
ReplyDeleteThank you for sharing your experience with us, Bradford. I'll bet the minds of our readers are racing with how they can adapt this information to their own projects. Me, too, I had forgotten about ceiling diffusers until yesterday. I may go buy one at lunch and get started on something new and fun.
ReplyDelete