Find hundreds of project photos, patterns, & instructions to start your glass crafting hobby today.

Monday, January 31, 2011

Personalizing Gifts with Gallery Glass

If you have ever noticed how flattered people are when they receive a gift with their name on it--this lesson is for you. Initials, nicknames, surnames and  titles always seem to work their magic when the gift is unwrapped and the thankful hugs and kisses commence. And the best thing is--Gallery Glass is one of the most inexpensive methods of personalization. Because you create the name or initials with Liquid Leading, your boundaries are unlimited. In other words, you're not charged by the letter--like engraving, etc.

Personalized gifts are immensely popular for birthdays, anniversaries, weddings, births and graduations--not to mention St. Valentine's Day. Team mascots or school logos are great gifts for teens or college students. Family names, crests, emblems and corporate logos appeal to just about everyone. We will focus on three different ways to approach the personalizing category. 
  • An entire project can be made depicting an emblem, crest, seal or logo. 
  • A second method requires a generic design that can be personalized with names or initials.
  • The third method uses large alphabet letters, more suitable for one word, and large enough to be filled in with paint.
This post has two different alphabets to use in creating these deigns; but you will want to collect more. You can't have too many in your resource file.

Customizing with insignias, emblems logos and crests: These special designs can usually be reduced or enlarged on a copy machine to an appropriate Cling size (5"x5"  is ideal). Or you can encircle the logo on a 10" round blank. Study the design to see how to best "segment" it. Add lines of outlining as necessary to make sure each element of the design has a leaded line where a new color begins.

  
Adding Lettering to a Generic Design: If lettering is to be used, follow the these directions before you begin to lead the design.
1. Make a straight line on a thin piece of paper. Place the alphabet pattern under the paper and use a pencil to trace the outline of the letters needed to spell out the name; leave the same amount of space between all letters. Do not fill in the letters, leave them open.
2. Trace the entire name or caption, then fold the word in half to mark the center of the caption.
3. Cut out the piece of paper with the word(s) on it and align the center of the word with the center of the area of the pattern to be personalized, also centering the height of the letters. Tape it in place.

4. Now follow instructions for outlining your design with Liquid Leading, tracing the letters with the leading on your penciled lines of the pattern. You may want to use a Fine Line Tip for Leading (see instructions under Leading Tips in this blog) if there are many letters and they are close together Let the leading dry overnight and apply the paint to the entire design, being careful not to leave light holes around the letters.


Making larger Names and Captions: A large open alphabet can be used to make captions that are "stand alone" words or names.
1. Make a straight line on a thin piece of paper. Place the alphabet under the paper and use a pencil to trace the outline of the letters to spell out the name; leave the same amount of space between all letters. Place them about 1/8" apart so that the letters will touch after they are leaded.
2. Place the pattern under a Leading Blank and lead only the outline of the letters, leaving the centers open for paint.
3. Let the leading dry overnight.
4. Fill in the letters with Gallery Glass paint. Painting each letter with a different rainbow color is fun and colorful.)
5. It is a good idea to paint between the letters with Crystal 'Clear so that the completed shape has no holes between letters.
6. You can also use the alphabet to fill in a personalized area in a generic design. The blank bar in the middle makes the design suitable for almost any name. If it's long, like SAMANTHA, overlap the letters when tracing the pattern-- as much as needed, so they will all fit.

Don't forget personalizing when you are selecting designs for your next project. It can be the difference between a good present and the best present EVER!


Gallery Glass Tape Tip Instructions - REVISITED!

At least half the questions and emails I get from readers, are about LEADING. I have been getting comments that the Tape Tip Instructions are not working for some of our readers.  I consider the Tape Tip so essential to happy Gallery Glass crafting that I am on a mission to update and expand on the instructions until every last one of you emails me and says, "Yes, I can make it, now!"

Preparing the Cap: First, remove the seal from inside the cap, replace the cap and use a craft knife to CUT the tip off the end of the Gallery Glass Cap. Cut down about 1/4" from the top, but don't cut past the ridge that holds the small clear cap on the bottle. (Just be sure to cut off the thick plastic at the very end of the cap. ) This tip can be used over and over again. Just be sure to clean it out and add a new tape tip every time you begin a new leading project. You can move this tip from bottle to bottle as you use up the leading--to save time.

Step OnePosition the tape: Pull off a  3 1/2" strip of 3/4" wide cellophane tape (Scotch 3/4" Magic Tape #810 is good). Place the left edge of the tape at an angle starting at the center of the cap (see diagram 1). Press the tape to the cap as you rotate the bottle, securing the first turn of the tape all the way to the end of the cap to prevent leakage. (This is very important, tape must be TIGHT at the end for the next step to work "turn" correctly. You may need to pull and stretch it slightly for the hole to be small enough and for it to begin the turn in the next step.)

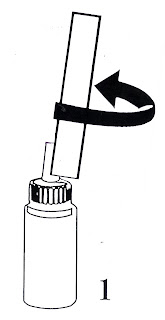
The angle shown will give you a small bead. If you wish to increase the size of the bead of leading--increase the angle to the RIGHT.  Be sure to leave the bottom of the tape positioned right in the very center of the tip as shown in the illustration, but position the TOP of the tape more to the right. I will sometimes un-wind and re-wind a piece of tape several time until the hole is exactly the size I want the bead to be. Experience will tell you which size hole works best for the intricacy of your design. The more intricate designs require a smaller bead in order to preserve that intricacy.

Step 2 - Forming the Cone:  As you turn the bottle in your left hand, and adhere the tape tightly with your right, the tape will form a cone (see diagram 2). Press tape to the cap firmly at the TOP as the tape changes direction to make the hole firm and secure. If the tape is loose, and doesn't turn--unwind and start again. Continue turning the bottle in your left hand and adhering the tape to previous layers with your right. This is the time to check the size of the hole you have made. Make adjustments if it is too small or too large. Un-wind and adjust the ANGLE (see step 1) of the tape- right makes it larger, left makes it smaller.


Step 3 - Reversing directions and reinforcing the tip: If the previous steps have been done correctly, the tape will reverse directions and reinforce the tip. Continue to turn the bottle in your left hand and allow tape to wind down. Keep it tight. Press any extra tape over the side of the cap to make a "tab" for easy removal later. Hole size can be further adjusted at this point. If the hole is too small, but the tip is good, snip the cone 1/8" to make a larger hole, although you shouldn't have to do this if you have adjusted the ANGLE of the tape in step 1.

Now let's talk about the leading bottle. There are 3 sizes of Liquid Leading. The 2 oz. bottle is a good size for kits, but not as economical as the 8 oz. size. The 4 oz. bottle is softer than the other two bottles because it is purchased primarily for Liquid Leading. It is the most popular size because it fits the hand perfectly and is easier to squeeze. I use the same 4 oz. bottle over and over because I can fill it from the 8 oz. bottle. Cut off the cap of the 8 oz. bottle above the ridge (Preparing the Cap - see above) and squeeze the leading into the 4 oz. bottle from the altered tips. Continue to re-fill the 4 oz. until all the leading is gone out of the larger size. Not only does this method save money, but it softens and thins the leading as it goes through the altered cap of the 8 oz. and this almost totally eliminates the "plops" of unexpected air that is the primary complaint of Gallery Glass artists.
Please let me know about the problems you encounter as you try to make this tip. The Tape Tip effectively controls the flow, gives you an infinite variety of bead sizes, and makes the leading easier to squeeze out of the bottle. What's NOT to like?


Leading of Modular Designs, Suncatchers and Leading Strips
Now, let's explore another leading situation--one where you will dispense the leading straight from the bottle. This method will be used for non-intricate suncatchers, the components of a window that is to be completed in the modular method and of course the making of straight lead strips for connecting the modules on the window. 
To begin, place smooth side of Leading Blank under pattern. Tape pattern to back of blank. Arrange all elements under sheets. If Leading Blanks are not available, you can tape the pieces to cardboard sized to fit inside a food storage bag. Do the elements on the outside of the bag.

1. Remove cap and seal from Liquid Leading. Push the curved end of the metal tool into bottle about 1/2" and twist around to make a large hole. Do not cut tip. Replace small cap on tip. Turn the bottle upside down and tap on a hard surface to force leading into the tip. Remove small cap.
2. Hold the bottle vertically, "broom handle" style, making sure the tip of the leading bottle does not touch the leading surface. Do not rest your elbow on your work surface, it will inhibit your movement. Squeeze  leading (1/8" to 3/16" in diameter) on the Leading Blank over the solid lines of the pattern taped underneath. When you get near the end of your line, stop squeezing and lower the bottle tip to the leading surface to prevent blobs of leading. Continue until all elements of the design have been outlined.
3. Leading Strips: Use a sheet of lined notebook paper as a pattern for creating leading lines. Tape to back of Leading Blank. Let Liquid Leading dry approximately 8 hours or until leading strips peel up smoothly. Window Color and liquid Leading paints can only be air dried. Do not try to hasten dry time with hair dryer or fan.

Quick Reference Leading Tips
Messy Lines: Uniform lines are achieved by holding the leading tip above the leading surface and coordinating pressure on the bottle with forward movement of the bottle. Practice on notebook paper until you have mastered this rhythm.

Beginning Bumps: Anchor the leading to the Gallery Glass blank or leading surface so leading will not curl up around the tip and create a bump before beginning the line. Wipe tip with a paper towel and anchor aw you begin to squeeze.

Ending Bumps: Stop squeezing earlier before reaching the end of the line--bring tip down allowing lead to end, or to join a previously leaded line.

Correcting Mistakes: This is easier after the leaded outline is dry. Use a toothpick to gently pull up only the unwanted portion of the outline and trim it away with small scissors. Press the remaining lead firmly back down to the surface.

Thursday, January 27, 2011

Valentine Clings on Vases and Things

I love Clings so much. Have you ever wondered where the idea of Clings came from? Well, here's the "skinny". One afternoon my daughter, Renee, noticed that a cured shape of Gallery Glass paint and leading would peel off a smooth surface and re-adhere to another smooth surface. I had a finished project laying on my work table and somehow (?), it got knocked off and the glass broke. She realized that the painted design did not break. She peeled it off the glass and pressed it against the Patio Door. Days, even months later, it was still there. And, voila, Clings were born. Since then, I have made about a million different designs and continue to use this technique--especially for temporary or seasonal decorating. It's the least expensive use for Gallery Glass because there is no cost for the surface. Clings can add color and fun to a wide variety of objects without the adhesion becoming permanent, which allows maximum versatility. An appropriate  surface can be used over and over again for other holidays. You probably remember the Autumn leaves that we had on them in the Fall Project Section. Now look how different they look full of hearts. 
Okay, so you don't have any pretty clear vases just sitting around? No problem. Drop in to your neighborhood dollar or discount store and you can usually load up with inexpensive vessels.


I also do a lot of personalizing for this holiday--putting names in the hearts and using them as picture frames for loved ones.  Meet Samantha (9) and Sydney (6), my special Valentines.

My friend Lynn has a glass panel in the front door of her office. She loves to decorate it with seasonal motifs and this is where Clings really shine.  At Christmas time, she covered it with Gallery Glass ornanents. Then after New Year's, she removed them and put up some different versions of the hearts we used on the vases above. First, she leaded and painted enough to cover the whole door. Then she peeled them off and positioned them on the door for maximum good looks. She gets so much good feedgack from her customers. They all want to know where to ge the product and how you do it, which she is glad to answer.


In case you want to create a sweet scenario of your own, here are the patterns for the hearts. The vases you see at the top were done with these same motifs. It will take two Gallery Glass Blanks to make them all.
The Gallery Glass Supplies are:
16015 Ruby Red, 16423 Hot Pink, 16021 White Pearl, 16014, Amethyst, 16442 Hologram Glitter, 16076 Liquid Leading, 16051 Leading Blanks. 

And now, here's my final heartfelt suggestion for you to be thinking about this next week. How about making a dozen hearts, or so, on the Gallery Glass reusable blanks. Cut the blank small enough to fit inside the Valentine cards that you send through the mail. Be sure to put the heart (still on the plastic) inside a clear plastic sleeve (or bag), because you don't want it to stick to the paper card. The recipient of that special Valentine may throw away the card, but you can bet the Cling will be on their window for months to come. Gallery Glass is such a good way to enhance the perceived value of the printed sentiment.
That's it. I'm done. All this sharing has made me hungry. I wonder if any of my co-workers have chocolate Valentine candy on their desk. Hmmmm...... 


Monday, January 24, 2011

Textured Projects from Bradford


One of our favorite readers has shared some more beautiful projects with us. You may notice some distinctive differences in the project on the left. I'm not positive, but I think that I recognize a special effect produced with the Gallery Glass pebble texture panel that was included in one of our Anniversary kits in 2000. However, you can get a similar effect by painting directly onto pebble textured clear ceiling panels. They come approximately 24" x48" and provide a nice large surface for painting that can be cut up into smaller projects. These two projects were originally 8"x 10" patterns. And regarding painting on ceiling panels, paint on the smooth side, that will give you even, uniform color, but the overall appearance (now with texture on the back side) will be uniformly bumpy. Plus, it is a lot easier to comb and tap when you paint on the smooth side. Painting on ceiling panels is a very inexpensive way to source a larger project surface. Because they manufacture millions of them, the retail price is very low, compared to buying custom cut clear plastic plastic panels that have the masking on both sides. And if you have a recessed lighting fixture in a room, such as a basement or kitchen, you can actually put the panel in the light fixture for an interesting decorative feature. However, you need to put the bumps up and the painting facing down into the room, so that the painted surface will not overheat. 


On a different note, here are two totally different roosters. One is textured like the Dogwood/Bird panel on the left above. The other has an interesting addition to the Gallery Glass painting that will give you lots of new ideas for embellishing. He used dried flowers at the top and bottom of the panel. I'm not sure if he added them before--or after the paint was dry. Tell us all, Bradford. If Roosters are one of your favorite collectible motifs, you're going to see that you are only limited by your Gallery Glass imagination. I must admit that I flipped the image of the one on the right so that it could be facing the other beautiful foul--something that you can do to the pattern before you begin, if you are creating a set of panels to match. Thanks, Bradford, for widening our horizons with your beautiful projects. 


Thursday, January 6, 2011

Laurie's Prayer Window-- in progress

Our reader, Laurie Morris, from South Carolina, was one of the first people to respond to GGC. She and I have exchanged a number of emails--sharing about our respective projects. Today she is letting me share one of them with you. Here, in part, is her explanation of the project.

Laurie said, "Remember when we first started chatting I told you I was planning to do a window for my Bible study room? Well I finally got over the material hump (odd size window) and started the project. Since I couldn't find styrene in the entire window size (plus the size is big enough that I wasn't sure how to mount it...industrial windows), I decided to divide the project into (4) sections. The church window actually has double paned windows with dividers on the inside of the panes, so naturally the window feels like four sections anyway. I found some plexi at Hobby Lobby and had to cut it down to size. I used an Xacto knife and scored several times. Couldn't cut the stuff, so I pulled out my Dremel Tool. Cut the plexi like butter but left a not so clean edge. So I went to the stained glass hobby section and bought some stained glass foiling tape (3/16"). Tape is sticky on one side. I applied the tape to all edges of the plexi. I used a "fid" to burnish the foil to the plexi. The foil covered my cut edge and made all the edges uniform (and sorta fancy). I searched the Internet for patterns and ended up drawing my own based on a few I had seen. The grapes are from the GG suncatcher book. Then I applied the GG. I am going to finish these four sections using that style."

Laurie, thank you so much for sharing your project. We are proud of your effort--especially since you haven't been doing Gallery Glass very long. And I'm proud that you are learning just like I did-- searching out traditional stained glass methods and products and adapting them for use in your projects. Speaking of which, the leaded glass category has wonderful colored glass blobs and clear bevels that can be incorporated into projects and held in place with Liquid Leading. On the left is a sample using the blobs. You lead and paint the whole design, leaving the circles for the blobs blank. Then after the paint is dry, you place the blobs in the blank circles and drop another bead of leading around them making sure that it touches both the sides of the blob and the layer of cured leading underneath. They make your project look very much like real leaded glass. You can use the same "double leading" technique with real glass bevels mounted on the glass. Here is a clock face that incorporates lots of clear bevels. We'll do more on this in future posts.


It's now been several weeks, and Laurie sent the 2nd panel photograph. It has a valuable lesson for us--regarding faces on people. It is difficult to lead the features on a face especially when it is so small. Laurie leaded the top of the beard, but the line was proportionally too thick to be "in scale". Add to the fact that this whole composition is on the plastic film discussed above and you see the other problem. It's not possible to score and remove painted areas from plastic--in order to re-do a section. We talked about how real church windows are full of religious figures, but the faces are often painted on a single piece of glass with ceramic paints--probably one stoke paints--and then fired to make it permanent. This is not possible with Gallery Glass, so Laurie and I came up with a couple of solutions. One, you can add the features after the face color dries with leading applied from a nutpick or stylus. Or you can use a permanent black marker, although it is difficult to get it to write on the Gallery Glass and it may fade out over time due to UV light. However, you can always re-apply, so that it a reasonable alternative. But we wanted you to see the panel because it is beautifully done and goes very well with the theme of the prayer window. When all four panels are done, maybe she will take a picture of the completed project in the Sunday School room window. It's going to look great. I can't wait to see it.

Laurie has finished Panel number three. She has a new camera and is trying to learn the settings. She says that the black of night is actually darker. There is some glitter in the night sky and she really likes the effect, although it doesn't show up in the picture. Her friends at church have been very supportive and complimentary--especially about this one. She admits that it is her favorite, so far. You know, even though I been a glass painter for over 30 years, in most cases, the painting I've just finished, is always my favorite. I really feel that my skills have improved with every single project. Since I am diligent about removing any section that was disappointing, the finished piece is usually "just the way I like it". So it's easy to see why I can say that my last piece is my best piece. I wish that for you, as you become more skilled. There is no feeling quite as good as that--is there Laurie?

Good job! And now we wait for the 4th and final panel.