
Back to school time puts more emphasis on sports and Fall holidays. You will want to celebrate each and every one with Clings. Some can be made into a themed overall window design and others are great for just the occasional temporary holiday motif on the window. I love to decorate my kitchen window over the sink with the Clings of the season. It helps me to focus on upcoming events so that I can maximize my efforts toward that holiday in a timely manner. Don't make Clings larger than your hand because they will not store as well and have a tendency to fold up on themselves. It's better to divide a large image into several parts and place them next to each other if you are making a larger decoration. After you've become familiar with the technique, scroll to the bottom the post to see a whole year of designs.
Please feel free to print out designs and patterns. 1. Move curser to image you wish to print. 2. right click on the image and sdelect "open link to new window". 3. Click "File" and select "print preview" 4. Adjust size by selecting "shrink to fit" and find the percentage that will allow you to print the whole design. 5. "print"
I would like to expand on the category of Clings. Below is what I would call the "long form" instructions. If you are a beginner, you will benefit from these tips and techniques.
Please feel free to print out designs and patterns. 1. Move curser to image you wish to print. 2. right click on the image and sdelect "open link to new window". 3. Click "File" and select "print preview" 4. Adjust size by selecting "shrink to fit" and find the percentage that will allow you to print the whole design. 5. "print"
 |
| Fall/Winter |

Positioning Your Pattern - Choose a Cling design, draw your own design, or adapt one from another source such as a coloring book. Place the pattern under a GG Leading Blank with the smooth side up. Clings will not stick to the window, if made on the rough side of the Blank. Surface Alternative: Trace the designs for your project, cut them out, and tape them ontio a piece of cardboard that will fit into a food storage bag. Make the Clings on the outside of the bag. Peel off and use the bag for new designs.
Outlining the Cling Design with Liquid Leading - Before you begin, protect your work surface with white or light color poster board,
Note: Decide if your Cling is too detailed for a 1/8" bead of leading from the bottle. You may need to use a Tape Tip. Instructions to create this narrower bead are given in this blog under the Leading Tips Category.
1. Prepare the Leading bottle: You bottle probably already has a hole, so remove the tip and remove the protective seal. Hold the bottle upside down and tap it firmly on a hard surface to force leading into the tip.
1. Prepare the Leading bottle: You bottle probably already has a hole, so remove the tip and remove the protective seal. Hold the bottle upside down and tap it firmly on a hard surface to force leading into the tip.
3. The grip: Hold the inverted bottle in "broom handle" fashion in a vertical position. Do not rest your elbow on the work surface; it will inhibit your movement.
4. Making a bead: Squeeze the bottle. As the leading begins to flow, "anchor" (or touch) the leading to the surface where you want to begin the line. Apply even pressure and a uniform cord of leading will form. Raise the tip of the nozzle above your work surface before moving forward. The "cord" of leading will drape down onto the pattern line as you squeeze the bottle, following your pattern as you move forward. When you get near the end of your pattern line, stop squeezing and lower the tip to your work and allow the bead to intersect with previous lines. By stopping pressure BEFORE the end of the desired line, a bump of extra leading at the end--is prevented.
5. Drying: The leaded project must dry for at least 8 hours before adding paint--longer if conditions are humid.
6. Correcting mistakes: After the leading is dry, use your fingernail to pull up any unwanted leading and snip off or trim it away with small scissors. Lay the leading line that remains back on the Blank and press firmly in place. Do not use a craft knife on the Leading Blank.
Carol's Tips for Leading
Messy lines: Uniform lead lines are achieved by dispensing leading ABOVE the surface and by coordinating your pressure on the bottle with your forward movement. Practice on notebook paper until you have mastered this skill. I practice making lines and grapes until they look smooth and uniform.
Beginning Bumps: If your leading curls up around the bottle tip as you begin to squeeze, you are not "anchoring" the leading to the plastic soon enough or you need to wipe the tip with a paper towel before beginning the line.
Ending bumps: If tails or bumps occur at the end of a line of leading, stop squeezing sooner than you are--well before you reach the end of the line--and bring the tip down to allow the bead to end on the plastic or a a previously leaded line.

Note: Do not shake the bottles of paint unless they appear to have separated, because the paint will get thinner, making it difficult to apply to a vertical surface without running. However, it is fine to use on horizontal surfaces, regardless of the viscosity.
1. Remove the cap. Clean out any dried paint you see in the tip. You can push it to the side, easing it out of the bottle, remove the dried paint and replace the tip firmly into the bottle by snapping it into place.
2. Coloring: Begin adding paint into your leaded design by squeezing it around the perimeter of the leaded area, then fill in the center. (see photo)

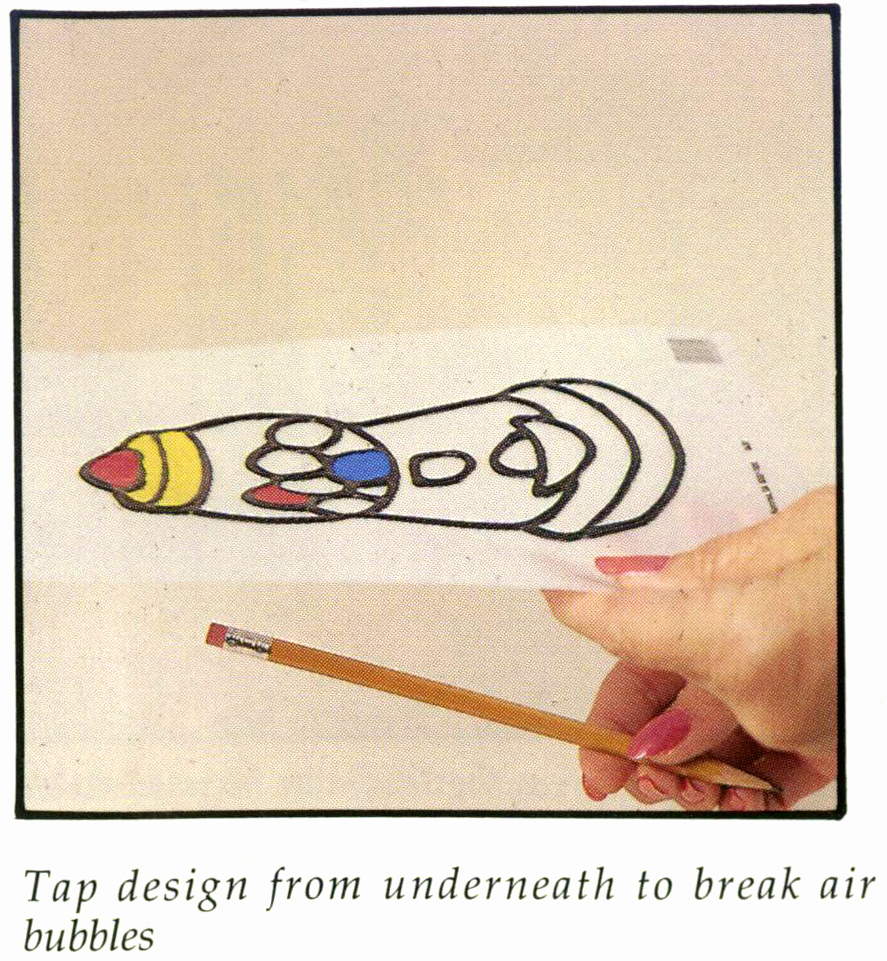
3. Combing: To minimize bubbles, "streak" back and forth in the paint to smooth the texture and pop the bubbles. Be careful when combing on plastic bags.
5. Clean-up: If you spill paint on clothing or another surface, wash it off immediately using soap and water; do not allow it to dry before removing it.
6. Drying: Allow the project to dry for 24 to 48 hours on a dry, flat surface with good air circulation, such as the top of the refrigerator. Drying time may vary depending on the thickness of the paint and the humidity. All cloudy areas must turn transparent before proceeding.

After the Cling has cured, it can be removed from your project surface (Leading Blank or Plastic Bag). Like magic, the leaded and painted design will peel up as one piece. The Cling can now be placed on a clean window or mirror where it sill adhere-- without addition glue or adhesive--until you wish to peel it off.
Carol's Painting Tips
Size: When designing your own Clings, limit the size to approximately 5"x5" for maximum durability.
Segmenting: Designs should be segmented so each color has a closed section. Add lines to your design where needed before the leading step. This step also adds to the look of real stained glass.
Holes: Small "light" holes in corners of painted sections can be eliminated by dabbing Liquid Leading over the hole. This method is less noticeable than re-coating the section with paint, or trying to patch just the gap with wet paint.
Changing a color: Change your mind, or someone put their finger in the wet paint? Wait until the Cling dries, remove the Cling from the Blank or plastic bag, and use small scissors to cut the paint as close as possible to the lead line and remove it. Place the Cling on project surface, press flat and apply more colors. Let the new color dry thoroughly.
Darkening a color: To intensify a color, you may apply more than one coat. Let each coat dry before applying the next.
Lightening a color: Paint may be lightened by mixing it with Crystal Clear before applying. Pour it into a foam cup and mix with a craft stick, then pour back into one of the bottles for application.
Cloudy look: All Gallery Glass paints have a milky appearance immediately after application, but they will be clearer whey dry. Some colors dry transparent (like Crystal Clear) and some dry translucent (like Snow White). Experience will show you which are more and less transparent.
Bubbles: Small air bubbles that are hidden under the surface during application can sometimes add to the realistic stained glass look. However. eliminate large bubbles for a more uniform coating either by using the tip of the bottle or a "pick" for popping. Be meticulous about Combing and Tapping. They are essential for a bubble free professional looking project.
Window Application, Removal & Storage
Window Application: Place the Cling on a clean window or mirror. Smooth the design from the center outward to avoid air bubbles. Note: Do not place Clings on moist windows that sweat in Winter.
Removal: To remove the Cling from a window, life the edge and pull gently. In cold weather, Clings may shatter if the glass is too cold. If it seems brittle or resists removal, warm it first with a hair dryer. In warm weather, the Cling can stretch during removal--wait until the glass is cool to remove it (like at night).
Reusing: If the Cling will not stick when reapplying, clean the back with a paper towel moistened with window cleaner before putting it on a completely clean window.
Storage: To store Clings, ideally place them on Leading blanks, press out any air bubbles and store in a plastic bag. Keep them cool and flat until ready to reapply. The bag is essential to keep the Clings flexible over time. Never store any Gallery Glass project in tissue paper, The paper fibers will adhere to the surface. However, paper fibers can sometimes be removed with a wet cloth and serious rubbing. Also, don't store in bubble wrap, the bubbles will leave bumps in the surface of the cling.
Now for the printable instructions that you may want to print out and lay beside you as you work. You can see the longer description of each step in the process printed above.

 |
| Winter/Spring |
 |
| Spring/Summer |
 |
| Hobbies & Careers |
 |
| Junk Food & Summer Fun |
 |
| Baby Aninmals and Pets |


