
- An entire project can be made depicting an emblem, crest, seal or logo.
- A second method requires a generic design that can be personalized with names or initials.
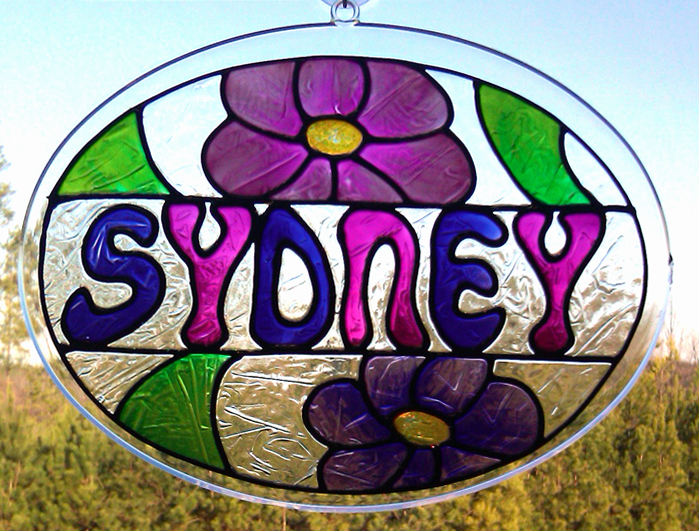
- The third method uses large alphabet letters, more suitable for one word, and large enough to be filled in with paint.

Customizing with insignias, emblems logos and crests: These special designs can usually be reduced or enlarged on a copy machine to an appropriate Cling size (5"x5" is ideal). Or you can encircle the logo on a 10" round blank. Study the design to see how to best "segment" it. Add lines of outlining as necessary to make sure each element of the design has a leaded line where a new color begins.
 Adding Lettering to a Generic Design: If lettering is to be used, follow the these directions before you begin to lead the design.
2. Trace the entire name or caption, then fold the word in half to mark the center of the caption.
3. Cut out the piece of paper with the word(s) on it and align the center of the word with the center of the area of the pattern to be personalized, also centering the height of the letters. Tape it in place.


4. Now follow instructions for outlining your design with Liquid Leading, tracing the letters with the leading on your penciled lines of the pattern. You may want to use a Fine Line Tip for Leading (see instructions under Leading Tips in this blog) if there are many letters and they are close together Let the leading dry overnight and apply the paint to the entire design, being careful not to leave light holes around the letters.


1. Make a straight line on a thin piece of paper. Place the alphabet under the paper and use a pencil to trace the outline of the letters to spell out the name; leave the same amount of space between all letters. Place them about 1/8" apart so that the letters will touch after they are leaded.
2. Place the pattern under a Leading Blank and lead only the outline of the letters, leaving the centers open for paint.
3. Let the leading dry overnight.

5. It is a good idea to paint between the letters with Crystal 'Clear so that the completed shape has no holes between letters.
6. You can also use the alphabet to fill in a personalized area in a generic design. The blank bar in the middle makes the design suitable for almost any name. If it's long, like SAMANTHA, overlap the letters when tracing the pattern-- as much as needed, so they will all fit.
Don't forget personalizing when you are selecting designs for your next project. It can be the difference between a good present and the best present EVER!
6. You can also use the alphabet to fill in a personalized area in a generic design. The blank bar in the middle makes the design suitable for almost any name. If it's long, like SAMANTHA, overlap the letters when tracing the pattern-- as much as needed, so they will all fit.

My chrystal clear is really thick, so thick it takes two hands to squeeze it from the bottle (not very practical). Should it be "that" thick? Is there a way to thin it or at least make it easier to squeeze out of the bottle?
ReplyDeleteHi Laurie, do you think the hole in the tip of the bottle might not be large enough to let the crystal clear flow out the way that it should? I've had that problem before when the temperature has been rather cold as well...Keep us posted!
ReplyDeleteHi Bradford - I thought of that. I did stick my nut pick into the tip so it's at least at wide as that. And I considered the cold might affect it. My craft room is cooler than the rest of the house. I thought about heating the CC like a baby bottle (sit the bottle in hot water). I'm also going to try putting some CC into an old (clean and dried) GG paint bottle.
ReplyDeleteThanks for your input, it's great to talk to a fellow GG fan. Guess that makes us GGF's
I"m positive Miss Carol can help when she reads your post...she is the GG Goddess LOL...there is nothing she doesn't know about it!!! Actually now that I think of it...instead of using something to open that hole up with I have usually take a pair of scissors and just cut the tip of my bottle off....that might be as a last resort for ya!
ReplyDeleteBradford suggested what I would recommend--making the hole bigger. When you put the nutpick in to the fat part, then twist the bottle completely around several times to "ream" the hole larger. Also, GG gets thinner if you shake it. We don't recommend it for vertical application (because you don't want it to run), but applying horizontally--it's fine. Also, the 8 oz. bottle is much firmer than the 2 oz. oval bottle, so moving it to a clean 2 oz. bottle will make a difference. However, I like dispensing Crystal Clear from the bigger bottle because I am usually covering larger areas and the bigger rounded tip helps slide the paint around to achieve the overall bumpiness that is so essential for it to look like Cathedral glass when it dries. Remember new paint is thicker. You can shake it, to make it thinner, but you can't make it thicker, so thick is a good thing--especially if you are applying it vertically on a window. Let us know how you come out. I'm the first, and the biggest GGF of all.
ReplyDeleteA word about temperature--70 degrees or above is recommended for a Gallery Glass work station. Cold temperatures lengthen drying times. So thicker areas of the Crystal Clear may stay cloudy, longer. To speed up curing time, put it in the warmest part of the room, like on top of the refrigerator--it's high and it's warm from the draft coming over the back from the motor. Your cold craft room could also affect the plastic bottles making them harder to squeeze. Move to the kitchen table until Spring.
ReplyDeleteHi All - Well thank you again Carol and Bradford, the bigger hole (even bigger than I had made it) made the difference. It's so nice to have a place to come, ask questions and get great advice!
ReplyDeleteAnd Carol, you are the GGQ (Gallery Glass Queen)!!
I had a feeling it was the opening in the tip. If the seal of the Crystal Clear has been removed and the paint has passed through the opening, it can form a coating in the end of the tip that is invisible, but a definite deterrant to squeezing out the paint. It takes a nutpick to remove it from the inside of the tip.
ReplyDeleteThanks, Bradford, for helping out on this one.
I'm glad you recognize the POWER of putting people's name, or their school, or their mascot, or their picture, or their kid's picture--even their initial--on a gift. They will love it, and you can often save a lot of money by giving an ego gift--especially if it's Gallery Glass. Thanks for your praise. It fluffed MY ego!
ReplyDeleteI know I'm late with a reply but just in case anyone else checks I'd like to say that as well as the paint being thick, it is also possible that there are clumps of paint inside. I have this problem quite often with paints that I don't use often. When it happens, I take off the top (just push it to one side and the top comes off easily) and then I'll run the handle of a paint brush inside and find the clumps and take them out.
ReplyDeleteI'm even later to reply, but it may help someone out there.
ReplyDeleteI had problems w/ clumps, it would clog, then explode out, messing all my work up:-( initially I would open, fish out clumps,but still annoying. MySOLUTION: remove top, cut a piece of screen bout 1/4" larger than bottle opening, push door/window screen evenly into the TOP, so it sits flat against base of nozzle, put top on and no more fussing w/ dumps or clogs! (Mesh type material may work too, or poke holes in plastic?)