Find hundreds of project photos, patterns, & instructions to start your glass crafting hobby today.

Showing posts with label Learn how Tips. Show all posts

Tuesday, November 10, 2015

Making Clings with Gallery Glass

Back to school time puts more emphasis on sports and Fall holidays. You will want to celebrate each and every one with Clings. Some can be made into a themed overall window design and others are great for just the occasional temporary holiday motif on the window. I love to decorate my kitchen window over the sink with the Clings of the season. It helps me to focus on upcoming events so that I can maximize my efforts toward that holiday in a timely manner. Don't make Clings larger than your hand because they will not store as well and have a tendency to fold up on themselves. It's better to divide a large image into several parts and place them next to each other if you are making a larger decoration. After you've become familiar with the technique, scroll to the bottom the post to see a whole year of designs.

Please feel free to print out designs and patterns. 1. Move curser to image you wish to print. 2. right click on the image and sdelect "open link to new window". 3. Click "File" and select "print preview" 4. Adjust size by selecting "shrink to fit" and find the percentage that will allow you to print the whole design. 5. "print"


Fall/Winter

I would like to expand on the category of Clings. Below is what I would call the "long form" instructions. If you are a beginner, you will benefit from these tips and techniques. 
How to make Clings - Gallery Glass Clings are easy and fun to mak. These are two simple steps to follow: First, lead the designs with Liquid Leading. Next, fill in the areas created by the lead borders with Gallery Glass paint.

Positioning Your Pattern - Choose a Cling design, draw your own design, or adapt one from another source such as a coloring book. Place the pattern under a GG Leading Blank with the smooth side up. Clings will not stick to the window, if made on the rough side of the Blank. Surface Alternative: Trace the designs for your project, cut them out, and tape them ontio a piece of cardboard that will fit into a food storage bag. Make the Clings on the outside of the bag. Peel off and use the bag for new designs.

Outlining the Cling Design with Liquid Leading - Before you begin, protect your work surface with white or light color poster board,
Note: Decide if your Cling is too detailed for a 1/8" bead of leading from the bottle. You may need to use a Tape Tip. Instructions to create this narrower bead are given in this blog under the Leading Tips Category.
1. Prepare the Leading bottle: You bottle probably already has a hole, so remove the tip and remove the protective seal. Hold the bottle upside down and tap it firmly on a hard surface to force leading into the tip.
2. Practice leading: Reap step 3, then practice that technique on notebook paper. When you feel comfortable with the technique, begin leading your project.
3. The grip: Hold the inverted bottle in "broom handle" fashion in a vertical position. Do not rest your elbow on the work surface; it will inhibit your movement.
4. Making a bead: Squeeze the bottle. As the leading begins to flow, "anchor" (or touch) the leading to the surface where you want to begin the line. Apply even pressure and a uniform cord of leading will form. Raise the tip of the nozzle above your work surface before moving forward. The "cord" of leading will drape down onto the pattern line as you squeeze the bottle, following your pattern as you move forward. When you get near the end of your pattern line, stop squeezing and lower the tip to your work and allow the bead to intersect with previous lines. By stopping pressure BEFORE the end of the desired line, a bump of extra leading at the end--is prevented.
5. Drying: The leaded project must dry for at least 8 hours before adding paint--longer if conditions are humid.
6. Correcting mistakes: After the leading is dry, use your fingernail to pull up any unwanted leading and snip off or trim it away with small scissors. Lay the leading line that remains back on the Blank and press firmly in place. Do not use a craft knife on the Leading Blank.

Carol's Tips for Leading
 Messy lines: Uniform lead lines are achieved by dispensing leading ABOVE the surface and by coordinating your pressure on the bottle with your forward movement. Practice on notebook paper until you have mastered this skill. I practice making lines and grapes until they look smooth and uniform.
Beginning Bumps: If your leading curls up around the bottle tip as you begin to squeeze, you are not "anchoring" the leading to the plastic soon enough or you need to wipe the tip with a paper towel before beginning the line.
Ending bumps: If tails or bumps occur at the end of a line of leading, stop squeezing sooner than you are--well before you reach the end of the line--and bring the tip down to allow the bead to end on the plastic or a a previously leaded line.


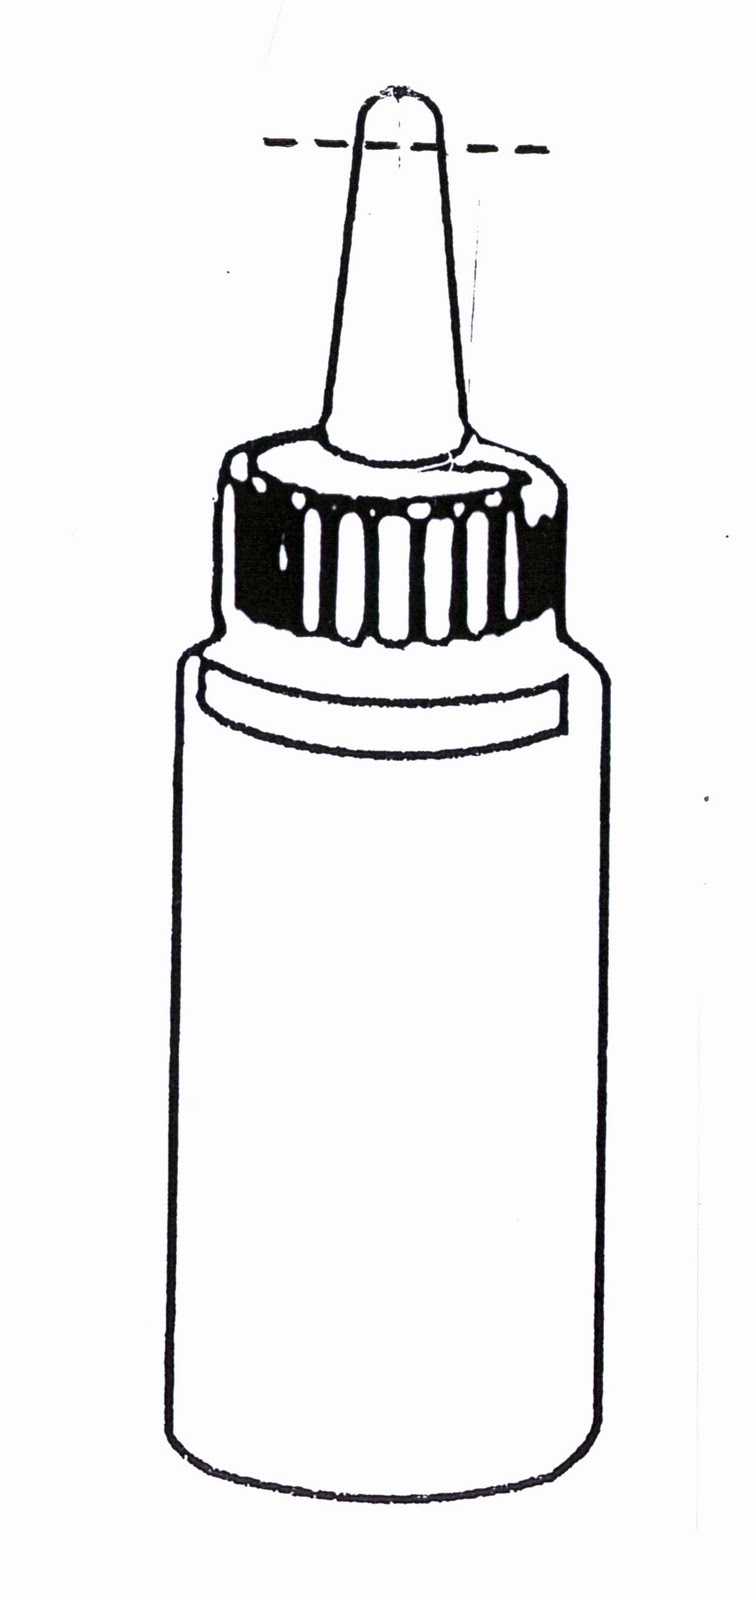
Painting the Cling with Gallery Glass Window Color (bottle in illustration is an older version of Window Color)
Note: Do not shake the bottles of paint unless they appear to have separated, because the paint will get thinner, making it difficult to apply to a vertical surface without running. However, it is fine to use on horizontal surfaces, regardless of the viscosity.

1. Remove the cap. Clean out any dried paint you see in the tip. You can push it to the side, easing it out of the bottle, remove the dried paint and replace the tip firmly into the bottle by snapping it into place.
2. Coloring: Begin adding paint into your leaded design by squeezing it around the perimeter of the leaded area, then fill in the center. (see photo)
Be sure to apply the paint up on the leading, using it as a bumper while  you are applying the paint. Failure to do so will leave light holes or a lighter "halo" next to the leading. The paint up on the leading will not show when the Cling is cured. Add a generous amount of paint up to the top of the leading, but do not add so much that it sticks up above the leading. If the colored area is too thin, the cured Cling may tear during removal from the plastic. Use a nutpick or a toothpick to evenly distribute the paint in the section. (See photo)
3. Combing: To minimize bubbles, "streak" back and forth in the paint to smooth the texture and pop the bubbles. Be careful when combing on plastic bags.
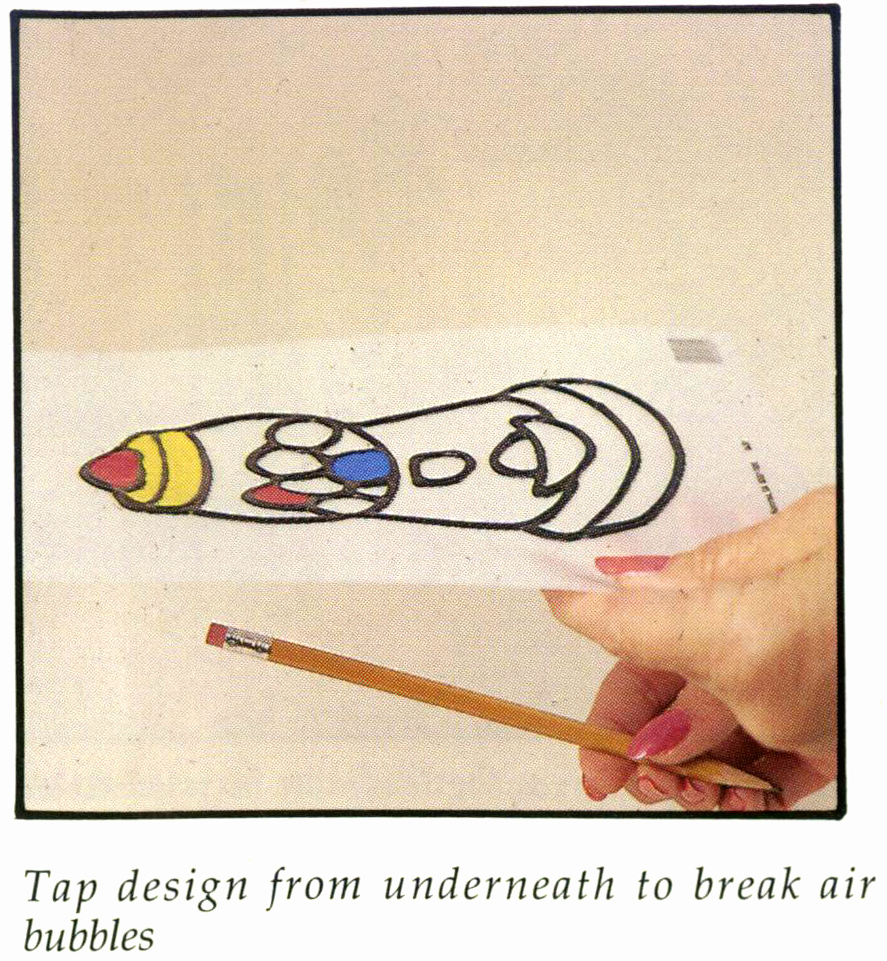


4. Tapping: After combing, more bubbles may be popped by "tapping". Hold the Leading Blank or piece of cardboard firmly in your non-painting hand and tap directly under the combed section with a pencil, the acorn end of the nutpick or the inverted bowl of a teaspoon. If using plastic bag covered cardboard, tap more firmly. (See photo)
5. Clean-up: If you spill paint on clothing or another surface, wash it off immediately using soap and water; do not allow it to dry before removing it.
6. Drying: Allow the project to dry for 24 to 48 hours on a dry, flat surface with good air circulation, such as the top of the refrigerator. Drying time may vary depending on the thickness of the paint and the humidity. All cloudy areas must turn transparent before proceeding.


Removing the Cling
After the Cling has cured, it can be removed from your project surface (Leading Blank or Plastic Bag). Like magic, the leaded and painted design will peel up as one piece. The Cling can now be placed on a clean window or mirror where it sill adhere-- without addition glue or adhesive--until you wish to peel it off.

Carol's Painting Tips
Size: When designing your own Clings, limit the size to approximately 5"x5" for maximum durability. 

Segmenting: Designs should be segmented so each color has a closed section. Add lines to your design where needed before the leading step. This step also adds to the look of real stained glass.

Holes: Small "light" holes in corners of painted sections can be eliminated by dabbing Liquid Leading over the hole. This method is less noticeable than re-coating the section with paint, or trying to patch just the gap with wet paint.

Changing a color: Change your mind, or someone put their finger in the wet paint? Wait until the Cling dries, remove the Cling from the Blank or plastic bag, and use small scissors to cut the paint as close as possible to the lead line and remove it. Place the Cling on project surface, press flat and apply more colors. Let the new color dry thoroughly.

Darkening a color: To intensify a color, you may apply more than one coat. Let each coat dry before applying the next.

Lightening a color: Paint may be lightened by mixing it with Crystal Clear before applying. Pour it into a foam cup and mix with a craft stick, then pour back into one of the bottles for application.

Cloudy look: All Gallery Glass paints have a milky appearance immediately after application, but they will be clearer whey dry. Some colors dry transparent (like Crystal Clear) and some dry translucent (like Snow White). Experience will show you which are more and less transparent.

Bubbles: Small air bubbles that are hidden under the surface during application can sometimes add to the realistic stained glass look. However. eliminate large bubbles for a more uniform coating either by using the tip of the bottle or a "pick" for popping. Be meticulous about Combing and Tapping. They are essential for a bubble free professional looking project.

Window Application, Removal & Storage
Window Application: Place the Cling on a clean window or mirror. Smooth the design from the center outward to avoid air bubbles. Note: Do not place Clings on moist windows that sweat in Winter.

Removal: To remove the Cling from a window, life the edge and pull gently. In cold weather, Clings may shatter if the glass is too cold. If it seems brittle or resists removal, warm it first with a hair dryer. In warm weather, the Cling can stretch during removal--wait until the glass is cool to remove it (like at night).

Reusing: If the Cling will not stick when reapplying, clean the back with a paper towel moistened with window cleaner before putting it on a completely clean window.

Storage: To store Clings, ideally place them on Leading blanks, press out any air bubbles and store in a plastic bag. Keep them cool and flat until ready to reapply. The bag is essential to keep the Clings flexible over time. Never store any Gallery Glass project in tissue paper, The paper fibers will adhere to the surface. However, paper fibers can sometimes be removed with a wet cloth and serious rubbing. Also, don't store in bubble wrap, the bubbles will leave bumps in the surface of the cling.


Now for the printable instructions that you may want to print out and lay beside you as you work. You can see the longer description of each step in the process printed above. 
Winter/Spring
Spring/Summer
Hobbies & Careers
Junk Food & Summer Fun
Baby Aninmals and Pets


Thursday, June 7, 2012

Horizontal, Modular and Vertical Application Methods- PRINTABLE INSTRUCTIONS

I have tried to explain in very detailed posts (that were project specific)--ALL the application methods, horizontal, modular and vertical. But the instructions have not been printable, and several readers have been disappointed that they could not print them out to study as they were doing their project.

So I had the idea to scan the explanation of each method from some of our old books--as attachments--and you should be able to right click on the instructions and follow the instructions on printing out from this blog--on the message board. You can put it in your files and compare the various methods of applying Gallery Glass whenever you are planning a project. Choosing the application method is about the first step to completing a window makeover, so you will be on the right track with your supplies list. You have to plan the whole project for it to turn out successfully.

The first method is the one that is most popular, and the one that Gallery Glass artists have used for decades-- the horizontal method. It is used for picture frames that have glass in them(framable art), injection molded blanks, suncatchers made on leading blanks and any other surface that will lie flat enough for the leading and painting.

It is also used for window makeover "inserts"--the method of cutting clear panels to the identical size of window panes --leading and painting the design--and then using a point gun or pressure points to affix the "inserts" against the glass. This works well because the edge of the "insert" is rarely visible to most people and it is so much faster and easier than the modular or the vertical method. It is also the easiest way to change your mind--and do a new design--or just have the plain windows again. The example to the left is a perfect example of an insert--chosen because it was much too detailed to do vertical and too "interlaced" to do modular.

Now let's explore the Modular method. It is used for "complicated windows that you could not possibly do one strip at a time. You make "suncatchers" of many of the elements of the design and let them dry on the leading blanks. When they are fully cured, you peel them up and arrange them on the window according to the design plan. Many times, you add straight strips with Redi-Lead and even paint the background of the window vertically. This "finishing" creates more of a finished look and also seals the suncatchers on so that they cannot be accidentally removed. It is hard to tell a modular design, but if there are some intricate curves, or if there is a lot of detail, it is probably a good candidate for the modular method. Notice the repetition of the 2 flower motifs in the window to the left. The stems and window box were added with Redi-Lead to tie the flowers and leaves together.
I am often asked to explain the Vertical Method. That is the method that only Gallery Glass Window Color can accomplish. It is the only glass paint in the marketplace that is thick enough to be applied vertically. One very important requirement of the vertical application concerns the viscosity (thickness) of the paint. I recommend that you always test the supplies that you plan to use for vertical application on the window where it will be used. Start applying the prospective paint in a back and forth motion, squeezing and spreading. If the pool of paint "runs", then I would plan on buying a fresh bottle. Gallery Glass gets thinner as it ages, so therefore new unopened bottles will yield better results.
This method is used primarily to save money by not having to buy "inserts" and for window design installations that have fairly straight lines and gentle curves. Also they should be fairly open because standing in front of a window for hours and hours, can be quite taxing. But sometimes it is worth it to save the $100+ dollars for inserts! Look at the step by steps to see how this particular window was done.

Tuesday, January 10, 2012

Mastering the Tape Tip for detailed Gallery Glass Paintings

I have been getting comments readers that say things like, "Leading is so hard. The bottles are hard to squeeze. I don't have enough strength to lead. I get too many air bubbles." As most of you know, I always recommend the Tape Tip to those people.
I consider the Tape Tip so essential to happy Gallery Glass crafting that I am on a mission to update and expand the instructions until every last one of you, emails me and says, "Yes, I can lead, now--and it's FUN!"

Preparing the Tip: First, remove the seal from inside the tip, replace the tip and use a craft knife to CUT the end off the end of the Gallery Glass tip. Cut down about 1/4" from the top, but don't cut past the ridge that holds the small clear cap on the bottle. (Just be sure to cut away the thick plastic at the very end of the tip.) This tip can be used over and over again. Clean it out and add new tape to the tip every time you begin a new leading project. You can move this "altered" tip from bottle to bottle--as you move on to other leading projects.  
Step One - Position the tape: Pull off a 3 1/2" strip of 3/4" wide cellophane tape (Scotch 3/4" Magic Tape #810 is good). Place the left edge of the tape at an angle starting at the center of the tip (see diagram 1). Press the tape to the tip as you rotate the bottle, securing the first turn of the tape all the way to the end of the tip to prevent leakage. (This is very important, tape must be TIGHT at the end of the tip for the next step to "turn" correctly. You may need to pull and stretch it slightly for the hole to be small enough and for it to begin the turn in the next step.)
The angle shown will give you a small bead. If you wish to increase the size of the bead of leading--increase the angle to the RIGHT! Be sure to leave the bottom of the tape positioned right in the very center of the tip as shown in the illustration, but move the TOP of the tape to the right, as needed. I will sometimes un-wind and re-wind a piece of tape several times until the hole is exactly the size I want the bead to be. Experience will tell you which size hole works best for the intricacy of your design. The more intricate designs require a smaller bead in order to preserve that intricacy. 

Step 2 - Forming the Cone: As you turn the bottle in your left hand, and adhere the tape tightly with your right, the tape will form a cone *see diagram 2). Press tape to the cap firmly at the TOP as the tape changes direction to make the hole firm and secure. If the tape is loose, and doesn't turn--unwind and start again. Continue turning the bottle in your left hand and adhering the tape to previous layers with your right. This is the time to check the size of the hole you have made. Make adjustments if it is too small or too large. Un-wind and adjust the ANGLE (see step 1). Remember: right makes it larger, left makes it smaller. 


Step 3 - Reversing directions and reinforcing the tip: If the previous steps have been done correctly, the tape will reverse directions and wind back down--reinforcing the tape tip. Continue to turn the bottle in your left hand and allow tape to wind down. Keep it tight. Press any extra tape over the side of the tip to make a "tab" for easy removal later. Hole size can be further adjusted at this point. If the hole is too small but the tip is good, snip the cone 1/8" down to make a larger hole, although you shouldn't have to do this if you have adjusted the ANGLE of the tape correctly in step 1. 

Okay, so how does it feel? If the tip is sturdy and well-made, it should last throughout your entire leading project. If you have to stop the process and come back to it at a later time, always start with a freshly wound tape tip!

Now I'd like to share some of my other tips and techniques about the Leading process and how to make it MORE FUN!

With this next technique, you can save money AND almost totally eliminate the "plops" of unexpected air that are the primary complaint of Gallery Glass artists--worldwide.

There are 3 sizes of Liquid Leading. The 2 oz. bottle is a good size for kits, but not as economical as the 8 oz. size. The 4 oz. bottle is made from a softer plastic than the other two bottles--because it is purchased ONLY for Liquid Leading. It is the most popular size because it fits the hand better and is easier to squeeze. I use the same 4 oz. bottle over and over because I can fill it from the 8 oz. bottle (saving money).
Cut off the tip of the 8 oz. bottle above the ridge (see Preparing the Tip-- above) and squeeze the leading into the 4 oz. bottle from the shortened tip. Continue to re-fill the 4 oz. bottle until all the leading is emptied from the larger size. Now you are ready to make your tape tip on the 4 oz. bottle and lead your project. The reason this method eliminates air bubbles and makes the leading flow better is because it softens and thins the leading as it is squeezed through the tip into the smaller bottle. The way this works is almost MAGICAL, and I don't know about you, but I need all the help I can get when I'm leading.
 Please let me know about the problems you encounter as you try to master the techniques that I have explained above. The Tape Tip effectively controls the flow of the Leading, gives you an infinite variety of bead sizes, and makes the leading easier to squeeze out of the bottle.

What's NOT to like? Let me hear from you. 
 

Wednesday, October 5, 2011

Casting Glass Textures - A Gallery Glass Technique

Framed panel designed by Laura Brunson
It's not NEW, but it is very different from the other traditional "outline and paint" techniques. In fact, you don't even have to lead, if you want to use Redi-Lead, it's the perfect place for it. Also, the painting is so different. It is done by pouring and spreading Gallery Glass on a reusable leading blank or textured plastic or glass surface. You can use casting techniques to create a variety of designs and textures with one color or by blending one or more colors to make a marbleized "slab". The borders and center motifs for this project were done on a ceiling diffuser that was purchased at the home improvement store for about $9. It sounds expensive, but it is really a "mold" for the paint and is 24"x48", so you could feasibly cast the whole project at one time. You will find them in the acoustic ceiling tile department. The background for the project was cast on a piece of "glue chip" glass purchased from a stained glass store. It is breakable and must be handled carefully, but it creates a texture that is one of the most popular in real leaded glass artwork. Of course, you could also apply Crystal Clear from the bottle for the background, but those of you who want to make Here's how you do it.

How to Cast


1. Spread Gallery Glass evenly and with a consistent thickness, using the palette knife from the Gallery Glass Tool set, of a spatula. Don't spread the paint so thin that you can see through it--it should be opaque. Let dry thoroughly.


2. Peel up sheet of cast paint.


3. Position casting on a tracing of your pattern. Cut out with sharp scissors, cutting through the paper. Peel paper away and place cast piece on surface.
Gallery Glass Supplies: Crystal Clear, 8 oz. 16081, Kelly Green 16008, Magenta Royale 16017, Amber 16020, Champagne 16094, Liquid Leading 16076 (or Redi-lead), Tool Set 16225
Other Supplies: Glue Chip Glass, Cracked Ice Styrene Panel, Wooden frame with glass, 8"x20", Craft knife, Needle nose pliers, 2 screw eyes, 3/4" 17" of #16 chain.

Instructions for Framed Panel
Leading: Position glass insert from frame over pattern. Trace with Liquid Leading. Let dry flat overnight.
Casting: Spread colors listed on pattern on indicated effects panels, using palette knife from Tool Set. Let dry overnight. Carefully peel cast color off effects panel. Position over appropriate area on panel. Trim to fit with a craft knife. Press in place.
Finishing: Insert screw eyes in top of frame 4" from edges. Attach chain for hanging.

Monday, January 31, 2011

Personalizing Gifts with Gallery Glass

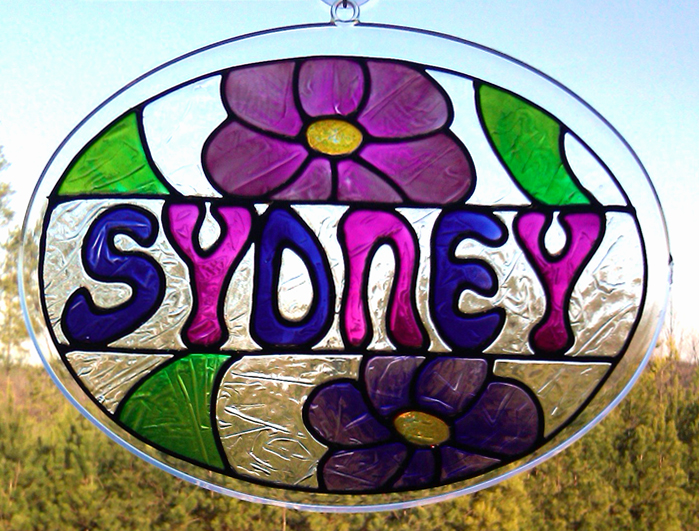
If you have ever noticed how flattered people are when they receive a gift with their name on it--this lesson is for you. Initials, nicknames, surnames and  titles always seem to work their magic when the gift is unwrapped and the thankful hugs and kisses commence. And the best thing is--Gallery Glass is one of the most inexpensive methods of personalization. Because you create the name or initials with Liquid Leading, your boundaries are unlimited. In other words, you're not charged by the letter--like engraving, etc.

Personalized gifts are immensely popular for birthdays, anniversaries, weddings, births and graduations--not to mention St. Valentine's Day. Team mascots or school logos are great gifts for teens or college students. Family names, crests, emblems and corporate logos appeal to just about everyone. We will focus on three different ways to approach the personalizing category. 
  • An entire project can be made depicting an emblem, crest, seal or logo. 
  • A second method requires a generic design that can be personalized with names or initials.
  • The third method uses large alphabet letters, more suitable for one word, and large enough to be filled in with paint.
This post has two different alphabets to use in creating these deigns; but you will want to collect more. You can't have too many in your resource file.

Customizing with insignias, emblems logos and crests: These special designs can usually be reduced or enlarged on a copy machine to an appropriate Cling size (5"x5"  is ideal). Or you can encircle the logo on a 10" round blank. Study the design to see how to best "segment" it. Add lines of outlining as necessary to make sure each element of the design has a leaded line where a new color begins.

  
Adding Lettering to a Generic Design: If lettering is to be used, follow the these directions before you begin to lead the design.
1. Make a straight line on a thin piece of paper. Place the alphabet pattern under the paper and use a pencil to trace the outline of the letters needed to spell out the name; leave the same amount of space between all letters. Do not fill in the letters, leave them open.
2. Trace the entire name or caption, then fold the word in half to mark the center of the caption.
3. Cut out the piece of paper with the word(s) on it and align the center of the word with the center of the area of the pattern to be personalized, also centering the height of the letters. Tape it in place.

4. Now follow instructions for outlining your design with Liquid Leading, tracing the letters with the leading on your penciled lines of the pattern. You may want to use a Fine Line Tip for Leading (see instructions under Leading Tips in this blog) if there are many letters and they are close together Let the leading dry overnight and apply the paint to the entire design, being careful not to leave light holes around the letters.


Making larger Names and Captions: A large open alphabet can be used to make captions that are "stand alone" words or names.
1. Make a straight line on a thin piece of paper. Place the alphabet under the paper and use a pencil to trace the outline of the letters to spell out the name; leave the same amount of space between all letters. Place them about 1/8" apart so that the letters will touch after they are leaded.
2. Place the pattern under a Leading Blank and lead only the outline of the letters, leaving the centers open for paint.
3. Let the leading dry overnight.
4. Fill in the letters with Gallery Glass paint. Painting each letter with a different rainbow color is fun and colorful.)
5. It is a good idea to paint between the letters with Crystal 'Clear so that the completed shape has no holes between letters.
6. You can also use the alphabet to fill in a personalized area in a generic design. The blank bar in the middle makes the design suitable for almost any name. If it's long, like SAMANTHA, overlap the letters when tracing the pattern-- as much as needed, so they will all fit.

Don't forget personalizing when you are selecting designs for your next project. It can be the difference between a good present and the best present EVER!