Find hundreds of project photos, patterns, & instructions to start your glass crafting hobby today.

Thursday, October 27, 2011

Laurie's Gallery Glass Prayer Window--Completed!

Our reader, Laurie Morris, from South Carolina, was one of the first people to respond to Gallery Glass Class. She and I have exchanged a number of emails--sharing about our respective projects. Today she is letting me share one of them with you. Here, in parts, is her explanation of the project.

Laurie said, "Remember when we first started chatting I told you I was planning to do a window for my Bible study room? Well I finally got over the material hump (odd size window) and started the project. Since I couldn't find styrene in the entire window size (plus the size is big enough that I wasn't sure how to mount it...industrial windows), I decided to divide the project into (4) sections. The church window actually has double paned windows with dividers on the inside of the panes, so naturally the window feels like four sections anyway. I searched the Internet for patterns and ended up drawing my own based on a few I had seen. The grapes are from the GG suncatcher book. Then I applied the GG.   I was still pondering how to hang the project. The deal with the church was "the decoration had to be temporary". I couldn't use the method you suggested (glazing gun) so I fired up the trusty Internet. The results, "static cling". You know those clings you buy at the holidays printed on vinyl, that principal. Now a more complicated search where to find the vinyl. You can buy printer friendly vinyl for making your own clings but the size is 8.5x11. My piece is approx 17 x 14. I went back to Hobby Lobby where in the fabric section I found clear vinyl for $2.99 a yard. It's .5 mm thick. I cut a piece just about 2-4 mm larger than my plexi. I dampened the back of the plexi (non-GG side) with water with a touch of dish liquid (per the Internet search). I aligned the vinyl on the plexi with the slight overhang. Then I dampened the window (water and dish liquid) where I am "hanging" the plexi. The vinyl "adheres" to the glass. It will stay until removed. I tested the "hanging method" at home for a few days, no problems with glass temp changes. When I went to remove the vinyl from my window today, it took some doing to get that vinyl to let go (need a long finger nail) but once it's started, it pulled away no problem. Currently I have some liquid leading directly on some vinyl and I believe the GG is just flexible enough that painting directly on it. But since my first window has the foil edge, I am going to finish these four sections using that style."


It's now been several weeks, and Laurie sent the
2nd panel photograph. It has a valuable lesson for us--regarding faces on people. It is difficult to lead the features on a face especially when it is so small. Laurie leaded the top of the beard, but the line was proportionally too thick to be "in scale". Add to the fact that this whole composition is on the plastic film discussed above and you see the other problem. It's not possible to score and remove painted areas from plastic--in order to re-do a section. We talked about how real church windows are full of religious figures, but the faces are often painted on a single piece of glass with ceramic paints--probably one stoke paints--and then fired to make it permanent. This is not possible with Gallery Glass, so Laurie and I came up with a couple of solutions. One, you can add the features after the face color dries with leading applied from a nutpick or stylus. Or you can use a permanent black marker, although it is difficult to get it to write on the Gallery Glass and it may fade out over time due to UV light. However, you can always re-apply, so that it a reasonable alternative. But we wanted you to see the panel because it is beautifully done and goes very well with the theme of the prayer window. 

Laurie has finished Panel number three. She has a new camera and is trying to learn the settings. She says that the black of night is actually darker. There is some glitter in the night sky and she really likes the effect, although it doesn't show up in the picture. Her friends at church have been very supportive and complimentary--especially about this one. She admits that it is her favorite, so far.   
And now  the 4th panel is finished. Here is the picture of it and here is Laurie's comments. "

"I like the last panel, but I think my favorite is the third one (with the hand and globe). My least favorite is #2 (Jesus). The good news is, all panels are mounted with velcro because the window is an
industrial type, I could not use glazing points (I think that is what they are called). I can change out the panels if better ideas come along."  
"Here are some of what I learned:
All panels were done on plastic film because with area was such an odd size. I would not use the plastic again. It was not at all forgiving of mistakes (couldn't remove and rework). On the plus side, because the plastic is light, the velcro is a great mounting options. I put foiling tape on all edges so they would appear move finished. I like the look and would use it again with glass or plexi but not the sheet plastic. During this project (all 4 panels) I really got better and better with the leading and now LOVE the tape tip. I actually trashed the metal tips I bought at the craft store."

"And lastly, unrelated to the panels but related to GG, I got a second place award from the SC State Fair for a Koi Block I made for my husband, even though I couldn't use the twinkle lights inside the glass block at the fair. My block was displayed next to a "real" stained glass window which I thought was done very nicely, it did not win a prize and both were in the "glass crafts" category."

Laurie, you are quite possibly my "Most Improved" reader. I feel a personal triumph because I goaded you into using the Tape Tip. You will find that creative opportunities pop up all the time, now that you can lead with ease! Hallelujah!

Here is Laurie's finished window. She's not happy with the picture and will take another one, which we will replace this one--with! Congratulations, Laurie, on a job well done!

Monday, October 24, 2011

8' Haunted House with Gallery Glass Windows

Sometimes you do something --just because you CAN! That's what happened when my family asked me to build a Haunted House for the Trunk or Treat at church. Now the event only lasts 1 hour, so you would think that any elaborate display would be out of the question. WRONG! I guarantee that we will not have either the most elaborate, or the most creative display. Couples plan all year for this brief, but brilliant event. Approximately 1000 children will race through the rows and rows of gaily decorated trunks getting one or more pieces of candy at each one. Our Monster Mash theme will be easy to spot because the Haunted House with the Gallery Glass windows will have the setting sun lighting up the glowing glass and Monster music will waft eerily through the air. A tub of water with dry ice will provide suitable "fog" effect and the handmade tombstones will be scattered under the hill with black gossamer filling in the spaces.
My granddaughters made the tombstones, and we came up with some good names for our pseudo relatives-- "Ima Goner", "Emma Ghost", "Reid N. Weep", "Westin Peas" and "Otto B. Alive".  We cut them out of the scraps of insulation and painted them with Wet Cement Martha Stewart Satin. We painted the edges with Gray Wolf and used alphabet punches to make the names out of black construction paper. After gluing the letters in place, I stenciled an icon above each name, then we sponged a combination of Beetle Black and the Satin Spray Medium over the edges first, then the central portion of each tombstone with a diluted potion of the Beetle Black--to make them look like granite that had been weathered away.
To begin constructing the house, I projected the design up onto 2 sheets of rigid insulation (only $11 per 4'x8' sheet) with my opaque projector and traced the outline of the windows and outside shape. It should have been perfect, except that the original drawing was so small that the projected image was extremely pixelated. So my tracing was wiggly and not symmetrical, which I cannot tolerate. So I spent two nights re-drawing the windows and doors and porticoes with a T-square. Once they were placed to my satisfaction, I put a new blade in an Olfa knife and proceeded to trim away the excess pinkness. It was really pretty easy. Cutting lengthwise is much easier than cutting across the grain. The curves are a little rough, but it really turned out rather well, considering the relatively small price that we paid for the huge display.
Once it was cut out, I was ready to paint. I chose to use the Martha Stewart Spray Gun Kit. It was easy to paint the face and the "facings" of each of the windows with the spray gun. I put plastic table cloths against a row of boxes in my garage and was pleased that there is minimal overspray. Simultaneously, I had been working on the windows. I traced an outline of each one and then selected a design from a dollhouse windows Dover book. I leaded them on Gallery Glass Cuttable plastic and also some larger pieces of plastic of the same material. I painted them to extend beyond the edges of the openings so that the irregularity of the openings would not be a problem. That worked pretty well, except where I mis-measured. Those had to be done over. But I was determined to get it right. The windows overnight and I was ready to attach them to the insulation. I bought a roll of black Duck tape and it was perfect to tape the trimmed plastic panels to the back of the house parts. The aggressive adhesive allowed the window panels to flex slightly as I lifted and toted the halves from the table to their vertical position. Once all the windows were in place, I taped the two sides of the house together in the center, so that the house could stand alone. We planned to put it on the tailgate of my son-in-law's truck to give it even more height and to make room for the "graveyard" underneath and "candy giver-outers" in front. My daughter got worried that the truck would be too visible, so we bought another piece of 2" rigid insulation and had it cut into two 4'x4' sections. This we painted black, as well and bought some inexpensive fencing to go on top. We thought it would give the impression of "gates" to the property-as well as hiding the sides of the truck, more effectively. The ladder-looking structures behind it were necessary to keep it from blowing across the partking lot, but they were so high up, that nobody mentioned them in the semi-darkness.

Our costumes could be only a little scary since our church asks that there be no frightening costumes. My only "cheat" was the goblin in the upstairs window that I added to the back of the window with Liquid Leading. So our whole display had to be on the MILD side, instead of the WILD side. I'm going to be a Wizard, Samantha was a cute Mummy, Sydney was a fetching Bat Girl and their parents were Frankenstein and his Bride. Pretty interesting costumes, but a lot of fun. The display was a huge success and we won the "Most Creative" prize. Hummmm, we're already thinking about what to do NEXT year, to top this!


Wednesday, October 5, 2011

Casting Glass Textures - A Gallery Glass Technique

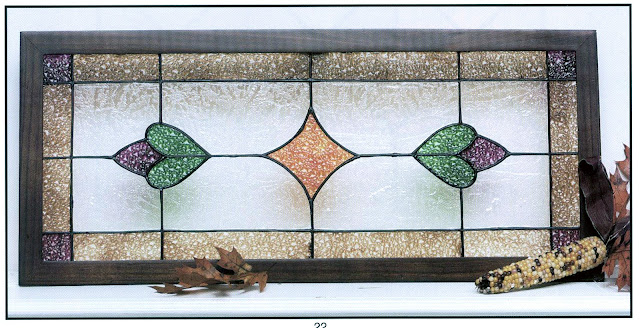
Framed panel designed by Laura Brunson
It's not NEW, but it is very different from the other traditional "outline and paint" techniques. In fact, you don't even have to lead, if you want to use Redi-Lead, it's the perfect place for it. Also, the painting is so different. It is done by pouring and spreading Gallery Glass on a reusable leading blank or textured plastic or glass surface. You can use casting techniques to create a variety of designs and textures with one color or by blending one or more colors to make a marbleized "slab". The borders and center motifs for this project were done on a ceiling diffuser that was purchased at the home improvement store for about $9. It sounds expensive, but it is really a "mold" for the paint and is 24"x48", so you could feasibly cast the whole project at one time. You will find them in the acoustic ceiling tile department. The background for the project was cast on a piece of "glue chip" glass purchased from a stained glass store. It is breakable and must be handled carefully, but it creates a texture that is one of the most popular in real leaded glass artwork. Of course, you could also apply Crystal Clear from the bottle for the background, but those of you who want to make Here's how you do it.

How to Cast


1. Spread Gallery Glass evenly and with a consistent thickness, using the palette knife from the Gallery Glass Tool set, of a spatula. Don't spread the paint so thin that you can see through it--it should be opaque. Let dry thoroughly.


2. Peel up sheet of cast paint.


3. Position casting on a tracing of your pattern. Cut out with sharp scissors, cutting through the paper. Peel paper away and place cast piece on surface.
Gallery Glass Supplies: Crystal Clear, 8 oz. 16081, Kelly Green 16008, Magenta Royale 16017, Amber 16020, Champagne 16094, Liquid Leading 16076 (or Redi-lead), Tool Set 16225
Other Supplies: Glue Chip Glass, Cracked Ice Styrene Panel, Wooden frame with glass, 8"x20", Craft knife, Needle nose pliers, 2 screw eyes, 3/4" 17" of #16 chain.

Instructions for Framed Panel
Leading: Position glass insert from frame over pattern. Trace with Liquid Leading. Let dry flat overnight.
Casting: Spread colors listed on pattern on indicated effects panels, using palette knife from Tool Set. Let dry overnight. Carefully peel cast color off effects panel. Position over appropriate area on panel. Trim to fit with a craft knife. Press in place.
Finishing: Insert screw eyes in top of frame 4" from edges. Attach chain for hanging.