
"I just found this very informative blog and I'm so happy I did. Thank you so much for all the great information and if you ever run upon a fleur-de-lis pattern and how you would suggest doing one please post it. That is my favorite decorating element. It might have something to do with being from Louisiana and adoring our Saints football team."
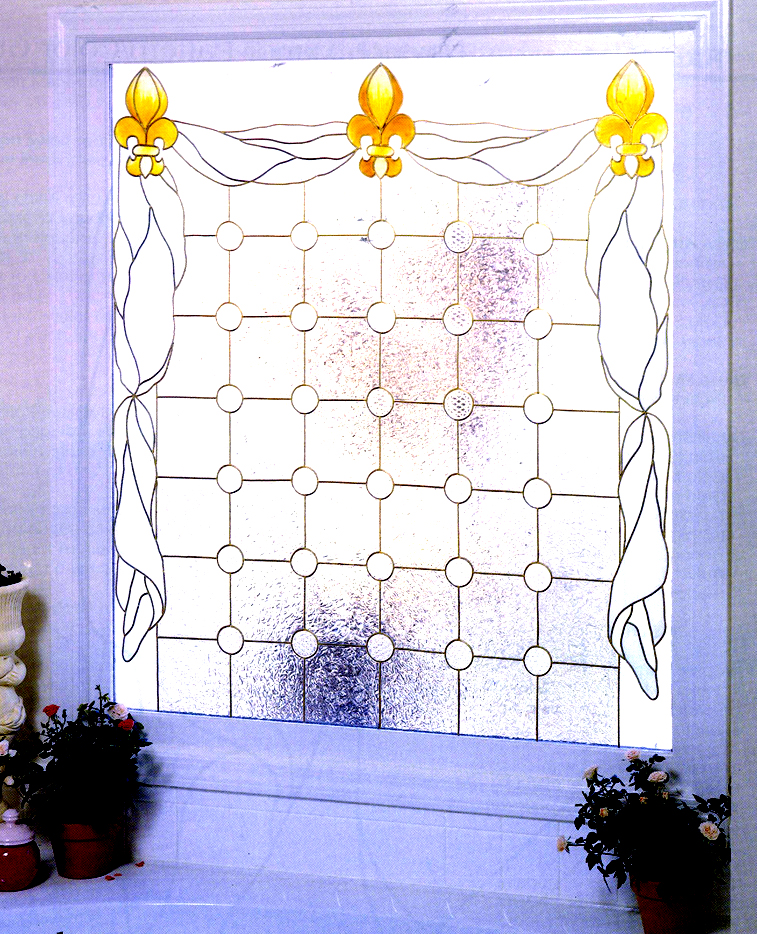
Diane, I don't know how ambitious you are, but here is one of my favorite Fleur de lis patterns from several years back. We photographed a book full of projects in the new home of a Plaid employee. They had NO window treatments, so we were free to go crazy. I love the simplicity and subtle color in this arrangement. It also has an air of formality, which may or may NOT, go with your decorating style. Not a Saints fan, no problem! There are a number of design motifs you could substitute for the fleur-de-lis. If you already have window treatments, you may want to enlarge the central pattern and do the design as a framed art piece. It would be appropriate for either an 8"x10", 9"x12" or 12"x18" with a simple border around the centered design. Here are the instructions for the window. This project incorporates Redi-Lead strips and the modular technique. Click on "Learn How Tips" to the right of the home page--for details about this technique.
Diane, you can enlarge an image and substitute the actual shape of the Saint's logo if you want.
Diane, you can enlarge an image and substitute the actual shape of the Saint's logo if you want.
1. Prepare window surface by protecting work area with paper towels. Clean glass with glass cleaner. Let dry. Measure window and create a pattern enlarging and adjusting design elements and measurements.

 2. Place Fleur-de-lis patterns under leading blanks and outline with Liquid Leading. Let dry. Paint them according to the color guide on the pattern. Transfer the pattern elements to the window, reversing them as needed. Peel off cured Fleur-de-Lis and place them on the window. Outline the shapes of the swags with Redi-Lead strips.
3. Using a black marker and ruler, mark off the center of the window into even squares. We used 6"x6" because it made sense for the size of our window. We used a GG large round bevel mold for the medallions, but it's discontinued, so you can make your own medallions by spreading Crystal Clear Gallery Glass across the bottom of some clear crystal glasses that have molded patterns on the bottom. Spread the paint evenly and let it dry thoroughly. Then trim off any "crust" that remains around the motif and place them in the outlined circles in the corners of the squares, as shown.
4. Paint the Swags using the desired colors. Apply Crystal Clear to all squares on window. Let dry.
5. Using small brush, apply Etching Medium to the background area outside of the swags.
Gallery Glass Supplies:
Amber 16020, Cameo Ivory 16003, Crystal Clear 16001/16081, Gold Sparkle 16019, Snow White 16002, Etching Medium 16044.


I am thrilled! I’ve always wanted something different for my bathroom window, but my choices always turned out to be so expensive. Life, haha! I think this one is perfect. Even if this is a DIY project, I think it could secure my need for privacy (my bathroom window is aligned along with my neighbor’s), without comprising style. ;D
ReplyDeleteThese designs look amazing. It’s really worth looking into if you plan to go for such a theme for your bathroom. At least you’re able to do it yourself, saving you money and giving you a new skillset in the process. Thanks for the post! Cheers!
ReplyDelete>> Eli <<