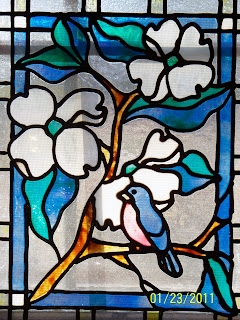
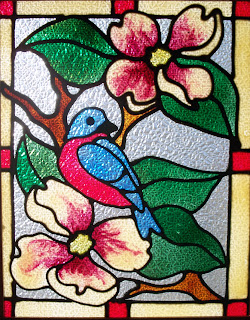
I'm not often bowled over by some one's Gallery Glass, but I love to be impressed. Bradford set me back on my heels with 3 of the most amazing panels I've seen. I'm going to tease you a bit by showing you one--at a time. They are definitely worth the wait. You may have read some of his posts on the blog since our launch. He's been a fan of Plaid's Gallery Glass since QVC days and has become quite an avid collector of Gallery Glass books and information. Here is what he said when he sent these beautiful pictures.
"This is Bradford from down in Alabama. I have spoken to you on a few occasions on your Gallery Glass blog. The reason I am writing is to send you a picture of some of my projects I have done over the years with GG. The black bar you see in some of the pictures are from the window casing that I had placed the paintings in for sunlight. I hope to get back to doing some more paintings soon. I want to try doing some more quilt patterns in GG, as well as possibly a few mandala designs. I hope you can get a place on your blog so that we can all post our pictures as we do our projects."
(His suggestion became the Artists' Gallery category and is a forum for many of our bloggers to share their work.)
This is living proof that you can take one of our patterns and reproduce it at home. If you don't believe me, look at the original in the Framed Art category. Actually, I like Bradford's better because I was demonstrating a set of new iridescent colors that we had introduced and it came out quite opaque. I like the transparency of this panel. Remember the dark bar is the window mullion.
I love, love, LOVE this idea--a Quilt designs-- which he mentions in his commentary. This piece has at least three notable features: first, the lace that he attached to the edge of the panel for framing --love that! I also like the "stitching" that he accomplished with Liquid Leading--great idea. But my favorite is the coloration, the background is not colored as you would normally think of painting it. Very Creative, Bradford, send us more for our new Artists' Gallery.

 A bit later in the year Bradford shared some more beautiful projects with us. You may notice some distinctive differences in the project on the left. I'm not positive, but I think that I recognize a special effect produced with the Gallery Glass pebble texture panel that was included in one of our Anniversary kits in 2000. However, you can get a similar effect by painting directly onto pebble textured clear ceiling panels. They come approximately 24" x48" and provide a nice large surface for painting that can be cut up into smaller projects. These two projects were originally 8"x 10" patterns. And regarding painting on ceiling panels, paint on the smooth side, that will give you even, uniform color, but the overall appearance (now with texture on the back side) will be uniformly bumpy. Plus, it is a lot easier to comb and tap when you paint on the smooth side. Painting on ceiling panels is a very inexpensive way to source a larger project surface. Because they manufacture millions of them, the retail price is very low, compared to buying custom cut clear plastic plastic panels that have the masking on both sides. And if you have a recessed lighting fixture in a room, such as a basement or kitchen, you can actually put the panel in the light fixture for an interesting decorative feature. However, you need to put the bumps up and the painting facing down into the room, so that the painted surface will not overheat.
On a different note, here are two totally different roosters. One is textured like the Dogwood/Bird panel on the left above. The other has an interesting addition to the Gallery Glass painting that will give you lots of new ideas for embellishing. He used dried flowers at the top and bottom of the panel. I'm not sure if he added them before--or after the paint was dry. Tell us all, Bradford. If Roosters are one of your favorite collectible motifs, you're going to see that you are only limited by your Gallery Glass imagination. I must admit that I flipped the image of the one on the right so that it could be facing the other beautiful foul--something that you can do to the pattern before you begin, if you are creating a set of panels to match. Thanks, Bradford, for widening our horizons with your beautiful projects.


thank you so very much Miss Carol for the kind words...they are very much appreciated....I haven't done a painting in months...I'm disabled and sometimes just dont have the energy to paint as much as I'd like..but I've been thinking about getting started again...the mermaid painting was done years back as a birthday gift to a cousin...I put sparkle mod podge on the pearl and as an accent in other areas as well as glueing starfish and sand dollars on the bottom of the painting..again many thanks for the compliments!
ReplyDeleteThanks for sharing the details about the Sparkle Mod Podge and the three dimensional aspects that were added. Good ideas. I love your work and hope that you enjoy my comments about it on a revised post.
ReplyDeleteBradford - I love your works!!
ReplyDeleteQuestion about the stitchin', added after you painted I assume, right?
The art and culture to the world by Brazilian artist's blog NEWTON AVELINO www.aartedenewtonavelino.blogspot.com
ReplyDeletepoll and leave your comment on the link http://blogrank.com.br/?p=390
hi Laurie many thanks for the compliment..I have just NOW reread these older posts and found your question....so sorry..to answer your question yes I waited until the GG was well dry before I added the stitch lines...you can try it the liquid leading if you really want a raised effect or you can cheat and just use a sharpie pen to draw in your stitching lines..you won't get the dimensional effect but from a distance it still looks like stitching
ReplyDeleteBradford, your work is Fantastic!!! The quilt is remarkable. I hope you feel up to painting soon, and share with us. We're waiting with bated breath!
ReplyDelete