I have been getting comments readers that say things like, "Leading is so hard. The bottles are hard to squeeze. I don't have enough strength to lead. I get too many air bubbles." As most of you know, I always recommend the Tape Tip to those people.
I consider the Tape Tip so essential to happy Gallery Glass crafting that I am on a mission to update and expand the instructions until every last one of you, emails me and says, "Yes, I can lead, now--and it's FUN!"
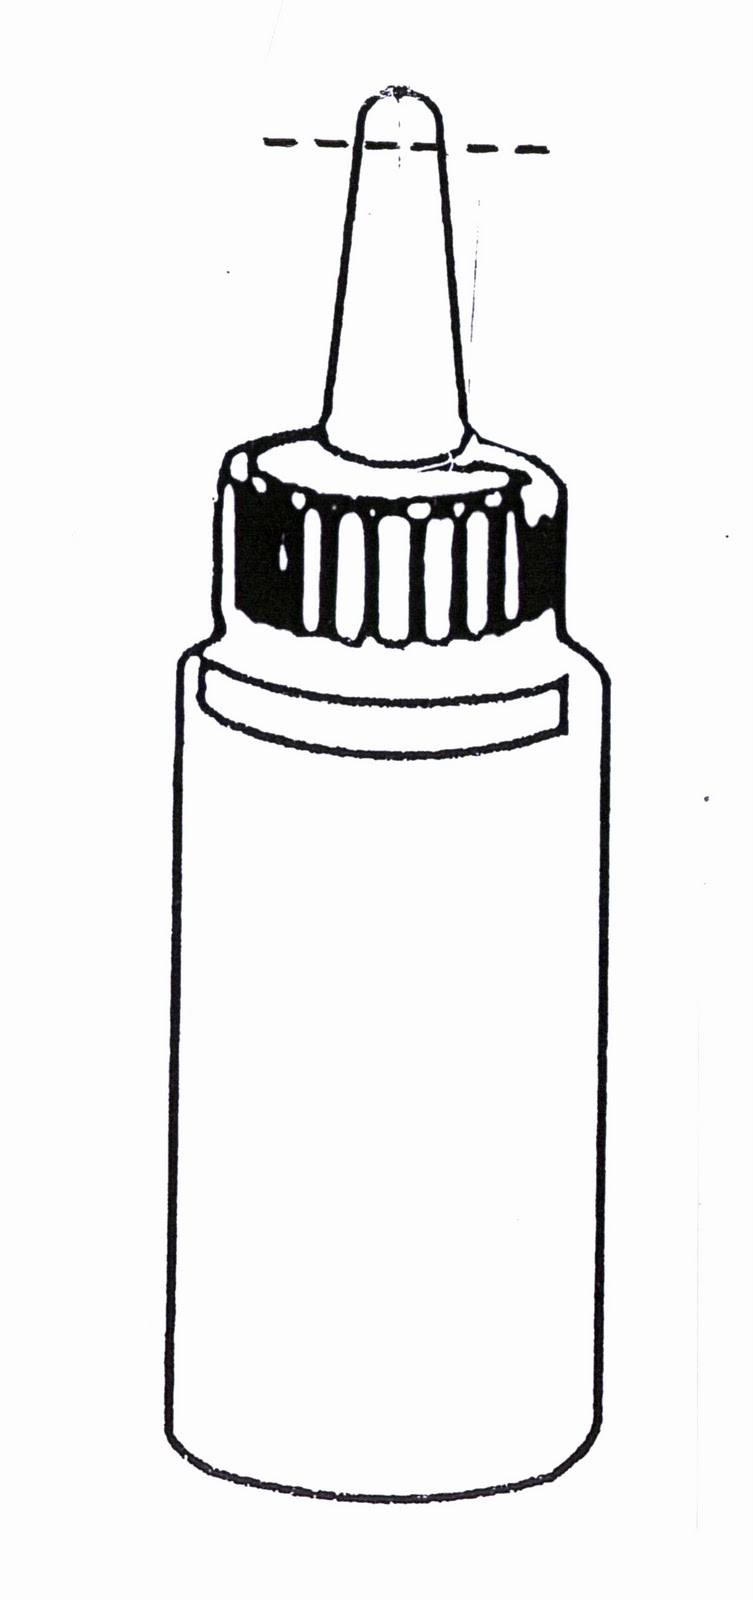
Preparing the Tip: First, remove the seal from inside the tip, replace the tip and use a craft knife to CUT the end off the end of the Gallery Glass tip. Cut down about 1/4" from the top, but don't cut past the ridge that holds the small clear cap on the bottle. (Just be sure to cut away the thick plastic at the very end of the tip.) This tip can be used over and over again. Clean it out and add new tape to the tip every time you begin a new leading project. You can move this "altered" tip from bottle to bottle--as you move on to other leading projects.

Step One - Position the tape: Pull off a 3 1/2" strip of 3/4" wide cellophane tape (Scotch 3/4" Magic Tape #810 is good). Place the left edge of the tape at an angle starting at the center of the tip (see diagram 1). Press the tape to the tip as you rotate the bottle, securing the first turn of the tape all the way to the end of the tip to prevent leakage. (This is very important, tape must be TIGHT at the end of the tip for the next step to "turn" correctly. You may need to pull and stretch it slightly for the hole to be small enough and for it to begin the turn in the next step.)
The angle shown will give you a small bead. If you wish to increase the size of the bead of leading--increase the angle to the RIGHT! Be sure to leave the bottom of the tape positioned right in the very center of the tip as shown in the illustration, but move the TOP of the tape to the right, as needed. I will sometimes un-wind and re-wind a piece of tape several times until the hole is exactly the size I want the bead to be. Experience will tell you which size hole works best for the intricacy of your design. The more intricate designs require a smaller bead in order to preserve that intricacy.

Step 2 - Forming the Cone: As you turn the bottle in your left hand, and adhere the tape tightly with your right, the tape will form a cone *see diagram 2). Press tape to the cap firmly at the TOP as the tape changes direction to make the hole firm and secure. If the tape is loose, and doesn't turn--unwind and start again. Continue turning the bottle in your left hand and adhering the tape to previous layers with your right. This is the time to check the size of the hole you have made. Make adjustments if it is too small or too large. Un-wind and adjust the ANGLE (see step 1). Remember: right makes it larger, left makes it smaller.

Step 3 - Reversing directions and reinforcing the tip: If the previous steps have been done correctly, the tape will reverse directions and wind back down--reinforcing the tape tip. Continue to turn the bottle in your left hand and allow tape to wind down. Keep it tight. Press any extra tape over the side of the tip to make a "tab" for easy removal later. Hole size can be further adjusted at this point. If the hole is too small but the tip is good, snip the cone 1/8" down to make a larger hole, although you shouldn't have to do this if you have adjusted the ANGLE of the tape correctly in step 1.
Okay, so how does it feel? If the tip is sturdy and well-made, it should last throughout your entire leading project. If you have to stop the process and come back to it at a later time, always start with a freshly wound tape tip!
Now I'd like to share some of my other tips and techniques about the Leading process and how to make it MORE FUN!
With this next technique, you can save money AND almost totally eliminate the "plops" of unexpected air that are the primary complaint of Gallery Glass artists--worldwide.
There are 3 sizes of Liquid Leading. The 2 oz. bottle is a good size for kits, but not as economical as the 8 oz. size. The 4 oz. bottle is made from a softer plastic than the other two bottles--because it is purchased ONLY for Liquid Leading. It is the most popular size because it fits the hand better and is easier to squeeze. I use the same 4 oz. bottle over and over because I can fill it from the 8 oz. bottle (saving money).
Cut off the tip of the 8 oz. bottle above the ridge (see Preparing the Tip-- above) and squeeze the leading into the 4 oz. bottle from the shortened tip. Continue to re-fill the 4 oz. bottle until all the leading is emptied from the larger size. Now you are ready to make your tape tip on the 4 oz. bottle and lead your project. The reason this method eliminates air bubbles and makes the leading flow better is because it softens and thins the leading as it is squeezed through the tip into the smaller bottle. The way this works is almost MAGICAL, and I don't know about you, but I need all the help I can get when I'm leading.
Please let me know about the problems you encounter as you try to master the techniques that I have explained above. The Tape Tip effectively controls the flow of the Leading, gives you an infinite variety of bead sizes, and makes the leading easier to squeeze out of the bottle.
What's NOT to like? Let me hear from you.


 Previous post: I just received this question from one of our readers. I can't place the pattern, although I probably have the book in the Archives if one of you can help me find what book it is in.


