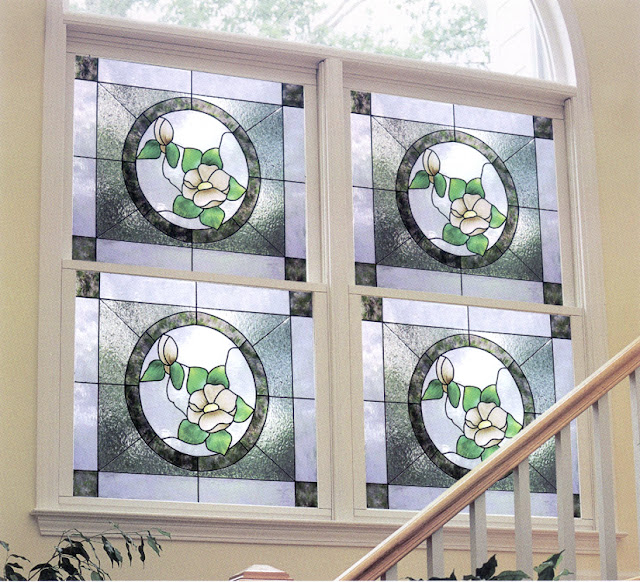
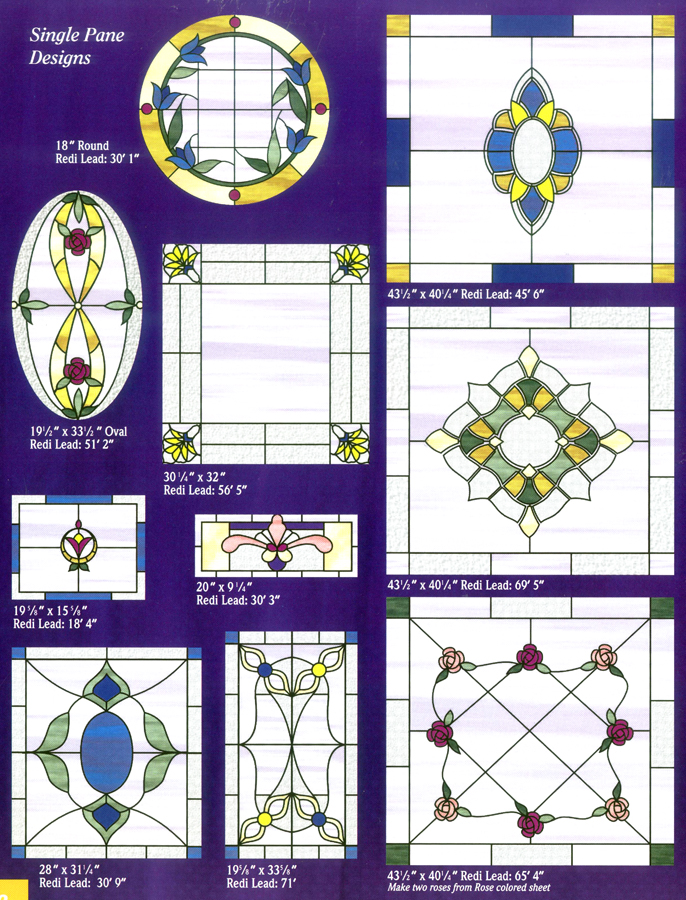
Redi-Lead lets you create the look of beautiful stained glass on plain glass doors, windows, mirror, sidelights and transoms. I'm going to go into the technique--in detail--in this post and give you lots of examples on these various surfaces. The best thing is--you can do it directly on the surface although it is already hung in your home. Patterns are adjustable to any size project.
The most popular texture is going to be a variety of Crystal Clear textures--made different by the method of application--bumpy swirled or striped.You can add the look of colored glass with one of the Gallery Glass Window Colors or the semblance of sandblasted glass with the Etching Medium. Add a metallic gloss to Redi-Lead strips with Treasure Gold Gilding paste. Before beginning, plan your project and become familiar with the techniques you want to include in your design.
Before Beginning Project
1. Read all instructions before beginning project.
2. Cut elements from pattern sheet and create design; or use one of the designs shown. You may want to make extra copies of the designs, or reduce or enlarge the elements on a copy machine.
3. Here are the decisions you must make before you begin: a. Which surface am I going to cover? b. Shat designs do I prefer? c. How many Redi-Lead am I going to need? d. Where will I use bumpy, striped or etched textures? e. How much paint will I need - one 2 oz. bottle of Crystal Clear will cover approximately one sq. foot depending on how thick it is applied. Etching Medium will cover about 8 sq. ft. stippled on.
4. Thoroughly clean the surface of the glass with glass cleaner.
5. Mark center of panes or window.
Instructions for Adjusting Pattern
If window patterns are symmetrical, you can get by with creating only 1/2 or 1/4 of the full sized pattern. To complete the design and make it fit the size of your window, follow the instructions below?
Adjusting and Transferring the Pattern
1 Prepare the pattern: Select the pattern you want. Notice if the pattern is one fourth, one half or a full pattern. (A mirror image pattern is required when the pattern is partial - see diagram of 1/4th pattern.
2. Measure and find the center of project glass surface and mark with a crayon or black fine tip marker. Mark a vertical and horizontal line through the center dividing the project into 4 equal quadrants. These lines will be so important for lining up the design.
3. Adjusting the pattern: Measure your window and compare dimensions of pattern with window dimensions.
a. Enlarging the pattern: add borders or make the existing border wider.
b. Reducing the pattern: Borders can be folded under or cut off. When drastically reducing the size of the pattern, cut and overlap in areas with straight lines--not curved pattern areas.
c. Use a copy machine to reduce or enlarge elements of the pattern.
4. Reversing the pattern (mirror image): put the original pattern up to a window and trace the design on the BACK of the original making a mirror image pattern.
5. Line up center vertical and horizontal lines on pattern with centering lines marked on glass surface; tape into place. Place transfer paper under pattern with ink side facing glass surface; transfer design down the center of lead lines. If mirror image, remove pattern, turn it to the reverse side, line up centering lines, tape in place and transfer the mirror image pattern to the second half of the glass surface. Repeat until complete design has been traced onto surface. Add borders and/or adjust pattern.
Applying Redi-Lead Lines
1. If you are making the Place Redi-Lead strips gold or silver, place the un-separated Redi-Lead strip on a sheet of wax paper (do not peel off the baking paper). Using an eye shadow applicator, apply metallic wax sparingly to the top surface of strips. Add more if needed to even out the color, but avoid leaving small lumps of wax on the lead surface. Polish the wax to a high shine with a soft cloth, moving any excess wax to the waxed paper. Don't apply to sides or back of individual strips.


3. Peel the strips off the paper and fit over the vinyl and transfer lines on the glass surface, piecing strips together end to end. Do not stretch or overlap ends of Red-Lead. If release paper tears and sticks to strip, STOP and begin peeling from opposite end of the strip. When a pattern line is longer than your strip, piece strips together end to end. Press strips onto design, making sure that they are flat on glass surface. Do not handle the strips more than necessary. Trim intersecting lines with Gallery Glass Cutter or your finger nail. If there is excess adhesive from strips on glass, use a piece of cellophane tape to gently remove from glass. or use cutter to scrap off excess adhesive. (Disregard clear texture in illustrations. The textured plastic film that is shown is no longer available. You will be putting the Redi-Lead on a clean window.)
4. Touch up all joints with Liquid Leading (Gold Leading was used in the illustration). Let dry; then use a small amount of Treasure Gold wax on foam applicator to color the leading spots. Keep Treasure Gold tightly capped between uses.
 How Humidity affects your Gallery Glass Project:
 Wait for a dry, non-humid day to paint the glass. Rainy days and high humidity interfere with application techniques and drying time. Window Color Paint appears milky when applied and clears up as it dries. Cured projects may appear cloudy on rainy days, when the humidity is high, or if moisture condenses on the surface. However paint will return to normal when humidity is lower or condensation is prevented. This condition may be more noticeable during spring and autumn when weather is mild and there is little heating, cooling or air circulation to control moisture in the home. Curtains or mini-blinds may also prevent air circulation and trap moisture, causing the paint to blister, cloud or lift. To eliminate this condition, remove covering or decrease the time that paint is covered. Bathrooms are important to keep as dry as possible. Open the door after long hot showers to equalize the humidity. Apply paint only to the outside of shower doors. Do not apply paint to non-insulated windows that run with condensation--at certain times during the year.
DO NOT SHAKE CRYSTAL CLEAR WINDOW COLORS. Small bubbles in the paint are normal and shaking "thins" the paint and will increase the risk of the paint running during application.
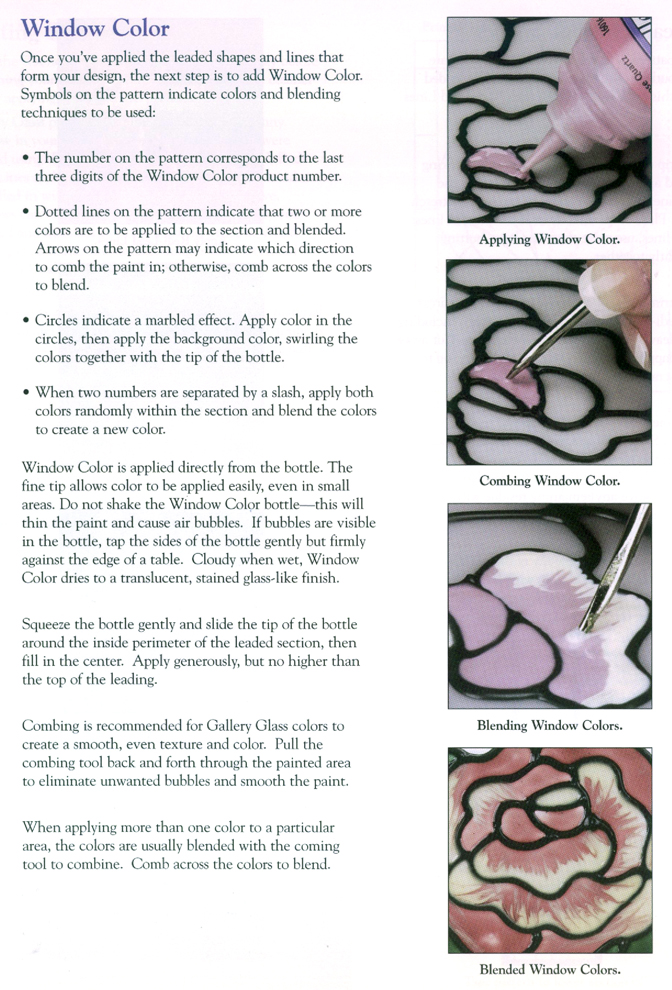
Painting Window Color Directly on Window

1. Protect window frame and window sill by taping off with masking tape. Cover window dividers and window sill with masking tape and place newspaper on the floor under the window. Don't cut the tip off the Liquid Leading or Crystal Clear. If a larger hole is desired, use a nutpick to pierce the tip and make it larger. If you spill paint on clothing or other surfaces wash them immediately with soap and water.


2. For best results, start at a top corner of the window and apply color to one section at a time. Run a thin line of paint across the top of the section, wiggling the tip back and forth as you move to the right side of the section. Repeat, moving side-to-side and downward to the end of the section. Be sure to cover the corners and apply paint thick enough to prevent light from showing through. If the paint begins to run, you are applying too much; use the tip to spread it thinner. Use less paint toward the bottom of the section because it may slide. Be sure to paint up to and over edge of the leading to seal the finished design and avoid light holes. For striped patterns, you can squeeze out hundreds of long lines of Crystal Clear Paint on a Leading Blank and let them dry over night. Then peel up and apply them cured strips side by side to the area that you want to have the striped pattern--cutting them even with the perimeter perimeter leading. For more privacy, place the strips close together.
3. Adding Colors directly to Glass Surface: Use colors directly from the bottle. Apply paint to a section, then use the pointed end of the nutpick perpendicular to the glass and comb or stroke back and forth quickly in straight lines through the paint. This gives paint a smooth grain. Do not comb Crystal Clear.
4. Window Color projects usually dry in 8 hrs. and cure in 3-7 days. Drying times may vary due to humidity, temperature and thickness of application. Allow Window Projects to cure at least one week before cleaning. To clean, spray very light mist of water on a soft cloth and wipe gently. Do not use an excessive amount of water or any solvent based cleaner or abrasive cleaning product.
This paint creates the look of sandblasted etched glass. Applying and removing it is different from other Gallery Glass Window Color paints. It looks best when applied sparingly with a brush to completely fill a section of a design.
Technique" Squeeze a small amount of Etching Medium onto a plate. Dip bristle ends of the brush into Etching Medium and spread out on clean area of the plate to distribute paint. Fill in the area to be painted thinly, so that paint begins to dry almost immediately. Clean brush with warm water and liquid soap. Do not use a wet brush to apply Etching Medium.
Removal: It will not peel up from the glass like other Gallery Glass paints. To remove it, spray etched area with Window Cleaner and use window scraper to lift paint. Removal from plastic panels is practically impossible.
Alternate Method
If you cannot place designs directly on your windows, you can create the same effect with acrylic sheets that are available at local hardware or glass stores. Have the sheets cut slightly smaller than the glass area of your window. Place acrylic sheet flat on a horizontal surface and create design. After design is completed, place it in front of the glass and hold in place with fasteners i.e. map pins, small nails. Window Color and Etching Medium will not peel up and cannot be removed from hard plastics such as Plexiglas or other surfaces that resemble glass. Adhesion to these surfaces is permanent.
Removal of One Section or the Entire Design
Crystal Clear and Window Color Paint: To remove a damaged section with Window Color Paint, use a craft knife and score the paint inside the leading lines; then peel up the corner and remove it. Paint again with window color.
Remove entire window design: Start in one corner and use craft knife to score the entire design around the perimeter of the window. Window Color Paint will peel off the glass, but Etching Medium may need to be scraped off. Use window cleaner and cutting tool as a scraper and remove the coating. Coatings that have been on for many years, may require more vigorous scraping with a larger heavy duty scraper from the hardware store. When applying coating to Garage doors, apply paint to the inside of the windows. Redi-Lead can be applied to the outside, if desired, to make the design look more like real stained glass.


