

"I've been doing lots of painting; my 3 front door windows, the long transom glass over my French doors in the master bedroom (on Plexiglas); I drew/designed/created an underwater coral and tropical fish design over the living room transom and used some paint direct methods and created some on blanks and moved to the glass (it's a long 3 pane window) did the 6 pane glass window on a back door; and then started on this project, which I really love."
(comment from Carol) Many people start out with a small project before they do a window. 30 years ago, when I first started glass painting after taking leaded glass classes (cutting and soldering), I used one of my 8x10" frame-able art patterns that I had done in my leaded glass class--as my first project. I outlined the design and filled it in with similar colors of paint--having very little faith that it would be acceptable, since I was a newly born glass snob and was only looking for the "real thing". The next morning I got up and put the two projects side by side in the window--and could not believe my eyes. The painted glass and my leaded glass project looked almost identical from half way across the room! That's the day my passion for glass painting took root and it's been growing ever since.

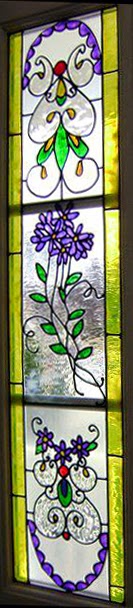
Sandra continues: "Actually, I wanted to do the bathroom window so no curtains were needed; I started searching for a pattern and between the Tiffany peacock and this one, I choose the iris's. I didn't know about the kit, I just was so enthralled with your creation that I downloaded your picture and googled to find the template, I can't remember where I found it, either on the blog or somewhere on the Internet. I downloaded Carol's finished picture to compare it to and searched for the colors of paint to match the template after finding the index of colors on your site. I ordered those not found locally at Michael's, and guessed on the ones I couldn't read from the blown up template, I think there was one no longer manufactured; I did add a couple of new ones like the hologram paint."

"It took me a couple of weeks to complete this in the evenings and weekends, I took pictures of the process from beginning to end. I used the pre-made lead (Redi-Lead) lines since the project was so large and the leading so perfectly even in width; my hand leading is not nearly that good!"

Sandra, you are one smart cookie! Keep sending us photos of your fabulous work. I would love to follow your journey into our enchanted Gallery Glass world!
No comments:
Post a Comment