(1) Preparation
a. Choose a design and colors for your room. Measure your windows and alter design to fit your window. Draw a pattern to fit your window pane. Patterns can be reduced or enlarged on a copy machine to fit your window. To enlarge a pattern dimension, add borders or make the borders wider. To reduce a pattern dimension, trim borders or make them smaller.
b. Gather supplies. Allow 2 oz. of paint per square foot.
c. Practice laying the leading strips on the surface you will be using. Get the feel of the paints. You can peel off practice areas before you start--for real.
d. To protect window, cover dividers and sill at the bottom of each pane with masking or painter's tape. Place newspaper on the floor under the window. Remove tape after paint sets up but before it is dry. Remove excess paint from dividers during application.
(2) Make leading strips with Liquid Leading or use Redi-Lead. Carefully estimate the amount you will need for the whole project. Measure and add together the lengths of all the lines in the pattern. Multiply the total by the number of times the pattern will be repeated on your window(s).
(3) Outline the design
a. Thoroughly clean the inside and outside of the window with glass cleaner.
b. Tape your pattern on the outside of your window so you can see it from the inside. If you can't access the outside of the window, transfer the pattern to the glass, using black transfer paper. Repeat transferring pattern as necessary to get entire pattern on the glass.
c. Working one strip at a time, pull up the Redi-Lead strips and press them to the glass, following pattern lines. Continue until all pattern lines are covered with leading strips. Trim corners and intersections so that there is only one layer. Don't go over lines or overlap the strips. Don't pull or stretch the strips as you apply them. Don't handle the strips more than necessary. Piece long lines by placing them end to end. When lines intersect, trim (miter) them neatly with a craft knife.Touch up gaps when you're finished by squeezing a small amount of Liquid leading over the gaps.
(4) Paint the design
a. Holding the tip of the bottle against the glass, apply paint to one section at a time. Begin in top left corner and run a thin line of paint across the top of the section and the leading above it. Be sure to cover the corners. Squeeze gently, and move the bottle with a wiggling motion side to side, working downward in horizontal rows, filling in one section at a time. Be sure to cover the corners and paint to the edge of the leading to seal the leading strips to the glass and avoid light holes. Always complete an entire section before beginning another section or taking a break. Don't shake the paint before applying--it will become too thin for vertical application. If it runs, you're applying too much paint. Use the tip to make it thinner and spread over larger area. Apply all paint straight from the bottle. Use less paint as you get to the bottom of a section; otherwise the paint may slide or droop. If you spill paint on clothing, wash it off immediately, using soap and water. Don't allow it to dry. Immediately wipe up spilled paint on window sill, sash, or frame with a damp rag. If paint dries on woodwork, spotting may result.
b. "Comb" the wet paint immediately with a toothpick or nutpick, working back and forth to create smooth, even color and to pop bubbles.
c. Complete Removal: Use a craft knife to score the paint just inside the window facing around the perimeter. Remove the entire painted area by peeling the leading and color away from the glass. If paint doesn't peel easily, use a hair dryer to soften the paint
Painting Tips and Techniques:
If paint stops flowing, use a paper towel to push tip to one side and lift it out. Use nutpick or long pin to pull dried paint from inside. Replace tip and continue painting.
To eliminate light holes in the corners of painted sections, dab some Liquid Leading over the hole. Liquid Leading will be less noticeable than patching the gap with paint.
To change a color before the paint dries, use a cotton swab to remove the unwanted color. Then repaint.
To intensify or darken a color, apply another layer of paint after the first layer dries.
To lighten a paint color, mix paint color with Crystal Clear.
If you want a translucent, not transparent look, paint your design with Snow White, Canyon Coral, Cameo Ivory, or Rose Quartz. Although all Gallery Glass paints have a milky appearance in the bottle and until they are thoroughly dry, these four colors have a cloudy translucent appearance when dry.
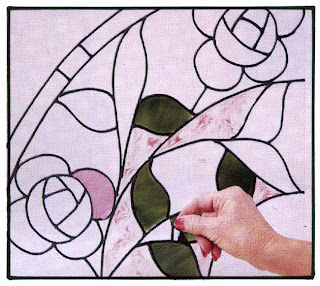 Change your mind about a color or section? if needed, you can remove just one or a few painted sections that you wish to change. Wait until the paint is dry, then use a craft knife to score the paint inside the leading. Simply peel out the paint from that section. Clean the section before applying another color.
Gallery Glass creates a realistic look because of its thick consistency. All hand-rolled glass has texture, and Window Color allows you to choose bumpy or smooth effects, depending on the application technique. Practice and experimentation will make unlimited variety and creativity available to you. You may want to experiment on the window or a separate piece of glass before beginning your project. Sponges, artist paint brushes, and small stencil brushes can produce very different textured patterns.
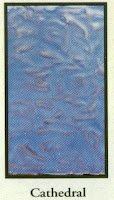 Cathedral - Use the method of color application described earlier in the post to achieve the look of textured, cathedral stained glass, or experiment with any of the special effects listed below.
 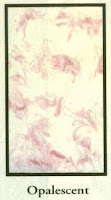 Opalescent - Translucent Window Color such as White, marbleized with one or more colors. Place drops of one color in an area, then fill in with a second color. Use the bottle tip or a toothpick to swirl the two colors. Do not overmix. Translucent colors used for both the dots and the background look more like opalescent glass.
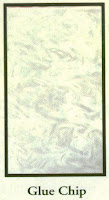 Glue Chip - Etched, fern-like designs on clear glass. This is a very popular look. A similar effect can be achieved by using the marbleizing technique with Snow White dots and Crystal Clear as the background.
 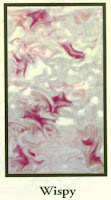 Wispy- Two or more colors marbleized into a clear background. Place dots of two colors on the glass, then fill in with Crystal Clear. Use the same technique as Opalescent.
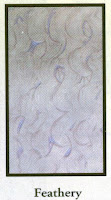 Feathery - Use a very soft flat brush. Put paint in a shallow cup and dip the tips of the bristles into the paint. Begin at the top and make a comma stroke to the right and one to the left. Continue in rows until the entire section is filled. The result is a quick, easy, feathery texture that covers a large area economically. Crystal Clear or Blue Diamond work best for this technique.
 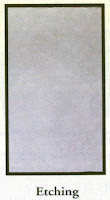 Etching or Stucco Texture - Use a stencil brush and a paper plate. Load the tips of the bristles with a small amount of paint. Use a pouncing motion to cover the section very sparingly. The finish looks similar to etched glass. This is an excellent finish for mirrors. Use Crystal Clear or Blue Diamond for best results.
 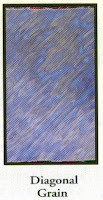 Vertical, horizontal or diagonal Grain - With the applicator tip touching the glass, apply the paint thinly in streaks. You can also use a toothpick to "comb" the paint to create a directional grain.
Opaque Colors - You can mix almost any shade of translucent paint by putting a bright color directly into a bottle of white and stirring well, then applying to the glass.
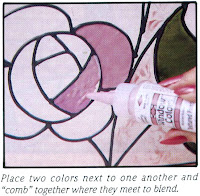 Shading - Put two colors next to each other in the same, then comb to blend the two together where they meet. This is perfect for flower petals, leaves, and fruits.
Pattern for Pink Rose Arch top:
Gallery Glass Supplies: 16008 Kelly Green, 16001 Crystal Clear, 16016 Rose Quartz, 16017 Magenta Royale, 16076 Black Liquid leading or Redi-Lead.
Pattern for vertical trellis:


Love iit
ReplyDeleteI think I'm going to try this one,on my garden door
Gallery Glass Class: Painting Windows By Vertical Application >>>>> Download Now
Delete>>>>> Download Full
Gallery Glass Class: Painting Windows By Vertical Application >>>>> Download LINK
>>>>> Download Now
Gallery Glass Class: Painting Windows By Vertical Application >>>>> Download Full
>>>>> Download LINK Di
This is very notable indeed! Thank you so much for sharing such a wonderful guide on how to beautify windows. I’ll definitely do this on my kitchen window. I’d still go with transparency though because I’d like to know what’s happening outside my house.
ReplyDelete- Sandra Ludwig
that was really helpful and nice thnk u soooo much
ReplyDeleteVery pretty! Would it be possible to use this product and application technique to decorate a glass shower door? Or would the humidity ruin it?
ReplyDeletewere can I get a 50 peace set of the colors. I REMEMBER. HELPING MY LATE AUNT DECORATE ALL THE WINDOWS. IN HER HOUSE AN MY FAV
ReplyDeleteWINDOW WAS THE BAY WINDOW IN THE LIVING ROOM THEIR WAS A BIRD FEADER. IN THE FROUNT YARD AN ANY WERE U SAT IN THE LIVING. ROOM THEIR WAS A BIRD AT THE FEADER AMONGST ALL THE NATURE. SETTINGS IN EVERY WINDOW. but I just need to know the web sight so I can buy a huge set an re-live some great memory's an make some more
To watch how the whole process is done is utterly amazing! Windows are essential parts of the house. They provide light and a nice view outside. After all, what kind of house would it be if it doesn't have windows? What you did here is truly wonderful. You were able to share the idea that there are a lot more things homeowners can do to beautify their windows. Thank you so much!
ReplyDeleteJohn @ Beach Windows & Siding
I had one of my mirrors break and part of the broken class had a round top and flat bottom shap. Just like the top picture. I did this pattern on it and put it over a door. I have had it there for ten years and everyone thinks it is real. Not only that but the mirrored reflection makes it look like you you are looking into the next room.
ReplyDeletePretty good post. I just stumbled upon your blog and wanted to say that I have really enjoyed reading your blog posts.
ReplyDeletePatio Window Replacement
Windows And Doors Las Vegas
Window Installation Service
I have an antique sash with four small panes of glass in the corners that I am making into a wall hanging. I want to make these four panes a solid color. Do I need to use leading around the edges? Should I paint the front surface, or the reverse? thank you for your assistance; this product looks like fun, and I've enjoyed your video.
ReplyDeleteNice blog. painting window accents transformed the house into something unique and beautiful. Thanks for sharing
ReplyDeleteExterior Window Borders
A very awesome blog post. We are really grateful for your blog post. You will find a lot of approaches after visiting your post. panele szklane do łazienki Wrocław
ReplyDeleteThis comment has been removed by the author.
ReplyDeleteCan you curve instant lead lines while applying to the window?
ReplyDeletePretty good post. I just stumbled upon your blog and wanted to say that I have really enjoyed reading your blog posts.
ReplyDeletePatio Door Replacement Cost
Windows And Doors Phoenix
Здравствуйте, дамы Если еще не определились, то я делала химическую завивку в салоне красоты в Бибирево. Хорошие мастера, довольна как слон! Рекомендую!
ReplyDeleteДоброе утро! Полезный блог. Респект за то, что опубликовали. Увлекательные анонсы о сосновых окнах на том ресурсе. Также можешь посмотреть тут: технические новости.
ReplyDeleteHey Carol, love it very much. What a gorgeous painting arrangement. The steps for The vertical application is used to create Gallery Glass designs directly on windows and other vertical surfaces was very terrifically loving. The color and design on the photos were really eye-catching. I was totally excited seeing the stunning design too. Indeed all the stuff were eye-catching and decor educative. Despite Window coverings Toronto my prime concern today, I was fully satisfied with what you delivered here for your fans and folks. Love it simply.
ReplyDeleteshare good content.
ReplyDelete인천출장마사지
Доброе время суток! Посмотрите путеводитель назначаемых медицинских средств. В справочное издание входят сведения о почти 700 производимых медицинских препаратах, производимых нашими и зарубежными фармацевтическими компаниями. О каждом медикаменте имеется полнейшая информация: состав и форма выпуска, целительные характеристики, показания к использованию, правила использования, взаимодействие со спиртными напитками, противопоказания, вероятные побочные эффекты и взаимодействие другими медикаментозными средствами, также вероятность использования при беременности, грудном вскармливании. В путеводитель включен тематический указатель, в каком находится инфа о том, какое лекарственное средство необходимо применять при тех или иных болезнях, состояниях, синдромах. Путеводитель можно прочитать на медицинском https://www.all-medications.ru/. Будьте здоровы Тизанидин, Нефть нафталанская, Эстрогены конъюгированные, Тикарциллин, Окситетрациклин, Фолиевая кислота,
ReplyDeleteInformative Blog
ReplyDeleteResidential painting surrey
Параллельно-раздвижные окна и двери – PSK-портал устанавливаются специально для экономии свободного, незаполненного места. Стандартные виды раскрываются вовнутрь помещения, что занимает весьма большую часть места в помещении. Нынешние модели позволяют избежать этой неприятности, увеличить воздушный и световой поток в квартире.
ReplyDeleteРаздвижные окна и двери являются системами, которые владеют весьма широкой площадью стекла. Для гарантии возможности открывания створок имеются нижние и верхние направляющие, при помощи которых створка бесшумно и легко скользит.
Раздвигание совершается с помощью ходовых роликов, что имеют в своем составе опору как компонент армирования, дающим возможность совершенно равномерно распределить вес по по всей двери. Они позволяют створке передвигаться во всевозможных режимах (наклона, сдвига).
Высота окна достигает 2360 мм, а ширина створки окна может меняться от 670 мм до 1,60 метра. С учетом суммарного веса (может быть от 100 кг до 200 кг), на параллельно-раздвижное окно устанавливается определенная фурнитура в целях обеспечения исправного открывания - закрывания створок, роста срока использования. Ширина свободного проема вполне может достигать 2 метров.
Подъемно-сдвижные порталы славятся хорошими герметичными характеристиками, отличными показателями звуко-, термоизоляции, имеют существенный уровень противовзломности, замечательно подойдут для всех вариантов современных профилей. При установке применяют опоясывающие щеточные уплотнители, что заметно улучшают работу створок.
Если же вам хочется оформить большой загородный дом, балкон, лоджию или городскую квартиру согласно модным тенденциям в оформлении, то компания-производитель СВ Окна сделает и установит параллельно-раздвижные окна и двери.
One question that potential buyers always ask is: “are all TV wall mounts universal?” This is a very good question. It wouldn’t make commercial sense for TV mounts to become such niche products that one would have to search for and buy a specific wall mount by a specific manufacturer for a specific kind of television set now would it? And fortunately, mount for 65 inch tcl this isn’t the case.
ReplyDeleteGallery Glass Class: Painting Windows By Vertical Application >>>>> Download Now
ReplyDelete>>>>> Download Full
Gallery Glass Class: Painting Windows By Vertical Application >>>>> Download LINK
>>>>> Download Now
Gallery Glass Class: Painting Windows By Vertical Application >>>>> Download Full
>>>>> Download LINK Ns
Really awesome Blog .For more information, you can visit this site- Treatmented Glass 10mm
ReplyDeleteThank You for sharing such an Amazing Content!! I would Love to share in Wall painters in Mumbai Group
ReplyDeleteYour painting so beautiful but Diamond Painting is looks nice
ReplyDeleteWhat an innovative approach to painting windows! This tutorial on painting windows by vertical strokes is not only creative but also practical. The step-by-step instructions and accompanying visuals make it seem achievable even for someone like me who isn't particularly skilled in painting. For those who might prefer leaving such intricate tasks to the experts, visiting Painters Inner West Sydney could be a wise choice. Their expertise in both interior and exterior painting, coupled with attention to detail, ensures a flawless finish every time. Thank you for sharing this helpful technique and the recommendation to explore Painters Inner West Sydney for professional assistance!
ReplyDelete